Understanding insulation depth in ceilings
What depth means for ceiling insulation
Chilly mornings in a Cape Town home remind us that warmth begins above us. The right ceiling insulation depth shapes how kindly a space holds heat long after dusk, turning drafts into a distant memory. When warmth lingers, daily life feels more graceful, more deliberate, more in tune with the rhythm of the seasons!
Depth matters because it governs the ceiling’s ability to trap heat and slow cooling. The beauty of a well-chosen depth is a room that feels present and calm, even as the air outside shifts. Ceiling insulation depth becomes a quiet partner in comfort, a measure of care that you can feel in every footstep.
- climate variation across South Africa
- ceiling height and architectural constraints
- existing gaps, vents, and structural opportunities
Such depth isn’t a trend but a memory preserved in plaster and timber—a subtle luxury for homes that dream of resilience, elegance, and enduring warmth.
Typical depth ranges for different climates
Across South Africa’s diverse climates, warmth often hides in the ceiling. Recent energy analyses suggest up to 30% of heat escapes through an under-insulated roof, a quiet leakage that turns cozy evenings into a quest for comfort. Understanding ceiling insulation depth helps map how climate shapes warmth above our heads. When the right depth settles in, a room feels calm and present, as if warmed by a steady ember—no shout of drafts, just a gentle, luxurious hush.
Typical depth ranges for different climates guide decisions and help visualise balance:
- Cool coastal/temperate SA: 100–150 mm
- Inland/arid interiors: 150–200 mm
- Highveld/cooler inland: 200–250 mm
- Colder regions/older homes: 250–300 mm
These ranges align with ceiling height, architecture, and the quiet rhythm of South African living.
How depth relates to R-values and performance
Across South African homes, up to 30% of heat escapes through an under-insulated roof, turning cosy evenings into a quiet chase for warmth. I’ve watched rooms soften when ceiling insulation depth meets the right measure, and a calm, ember-lit hush settles over the space.
Understanding the dynamic of depth in ceilings is like tuning a piano; the right measurement strengthens R-values and boosts overall performance.
- Material and density shape the R-value per centimetre
- Installation quality and continuity influence effective depth
- Thermal bridging and ceiling height modulate how depth translates to comfort
When depth aligns with climate and construction, the ceiling becomes a reservoir of calm, a quiet ember above us.
Quick check: is your attic insulated to the right depth?
Across South African homes, up to 30% of heat slips through an under-insulated roof. A precise ceiling insulation depth can turn that loss into comfort, a soft ember in stone and timber. When depth aligns with climate, the attic becomes a warm, quiet sanctuary.
Quick check: is your attic insulated to the right depth? If the roof breathes too freely, you’ll feel the chill linger. The idea of ceiling insulation depth carries a subtle power: the right measure makes warmth feel effortless under the eaves.
Consider these influences on the practical depth of your ceiling insulation:
- Material and density shape the warmth per centimetre.
- Installation continuity ensures the depth counts to every corner.
- Thermal bridging and ceiling height modulate how depth translates to comfort.
When depth and climate meet, the ceiling ceases to cap the room and begins to hum with a quiet, ember-soft glow above us.
How to calculate the right insulation depth for ceilings
Factors influencing needed depth: attic size, volume, and air leaks
In South Africa’s capricious climate, the ceiling insulation depth you choose is more than a number—it’s a quiet wager with your bills and comfort. A modest tweak can turn bone-chill mornings into a sanctuary of warmth and efficiency.
To gauge the right ceiling insulation depth, consider three forces: attic size, internal volume, and air leaks. Bigger spaces demand more depth for heat to stay put, while gaps invite costly losses that undermine any gains in performance. Depth isn’t a fixed target; it shifts with how your home breathes.
- Attic size and layout
- Internal volume and ceiling height
- Air leaks and sealing quality
By weighing these factors, you glimpse how ceiling insulation depth shapes long-term comfort and energy use across South African homes. The balance you strike today travels through every room tomorrow!
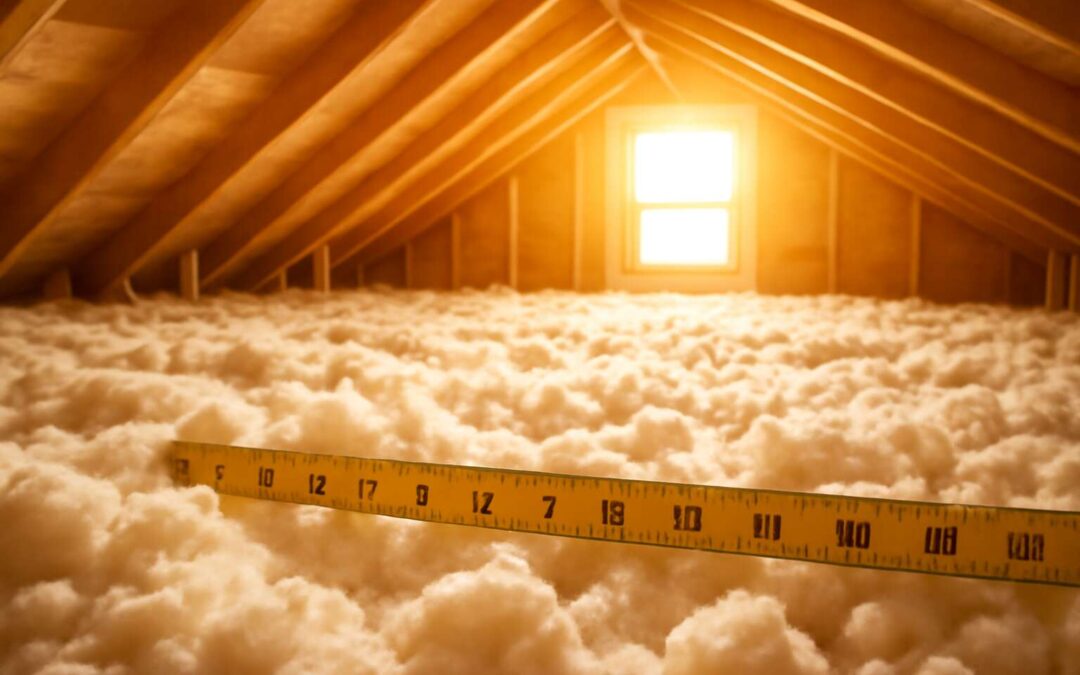
Steps to measure current depth accurately
Heat moves quietly, and the ceiling is its front line. The right ceiling insulation depth transforms frigid mornings into a welcoming room and trims the energy bill without fanfare. It’s not a single number but a reflection of how your attic breathes, where leaks hide, and how your family uses space—especially in a South African home.
To estimate it without overcomplicating the process, consider three broad steps:
- Spot-check insulation thickness across representative attic locations to understand variation
- Document measurements to form an average depth that captures pockets and gaps
- Compare findings with local climate guidance and energy goals
That quick snapshot clarifies the ceiling insulation depth you’re aiming for and keeps future decisions grounded in reality.
Tools and calculations to estimate required thickness
Warming a South African morning starts at the ceiling; heat slips through like a shy rumor. In many homes, up to a third of heating energy escapes via the attic, so getting the ceiling insulation depth right isn’t magic—it’s a practical balance of space, materials, and climate realities.
To estimate without turning the attic into a guesswork maze, assemble a small toolkit:
- Measuring tape and notebook
- Product specifications for the insulation you plan to use
- A simple calculator or app to translate R-values into thickness
- An infrared camera or thermometer to spot cold pockets
The core concept is simple: pick a target R-value for your climate and divide by the material’s R-per-thickness to get thickness. For example, if you want R30 and your insulation runs about R3 per inch, you’d target roughly 10 inches (about 25 cm) of depth—converting to millimetres as needed, which directly informs the ceiling insulation depth.
Attic layouts vary, but this framework keeps expectations grounded and measurements meaningful when planning upgrades.
Code, standards, and regional guidelines for attic insulation depth
Building codes and minimum thickness requirements
“Depth is destiny in the attic,” a saying that still guides builders in South Africa as they measure ceiling insulation depth to keep warmth in winter and shade in summer. The code book, SANS 10400-XA, frames the energy-efficiency targets for new work, linking protection, comfort, and performance. Regional guidelines shift with climate—coastal breezes, inland extremes, and the highveld’s cool nights all shape expectations and enforcement. Some regions spell out minimum thickness targets to ensure performance.
- SANS 10400-XA energy efficiency requirements
- Climate-based regional guidelines by local authorities
- Municipal amendments and permit checks for insulation installation
In this saga, ceiling insulation depth sits at the crossroads of design and regulation, guiding installers toward compliance while preserving homes from wasteful heat transfer.
Climate zone considerations and recommended depths
Heat is a stubborn guest—up to 40% of a home’s warmth slips away through the attic when ceiling insulation depth is skimpy. SANS 10400-XA frames the energy-efficiency targets for new work, linking protection, comfort, and performance. Local trends bend to climate, yet the aim remains: tighter envelopes and smarter depth choices.
Code, standards, and regional guidelines for ceiling insulation depth set the stage. Climate zone considerations and municipal amendments shape what inspectors expect during permit checks, ensuring that daylight-saving wisdom doesn’t become a thermal disaster.
Climate zone considerations and recommended depths:
- Coastal climates: balancing moisture risk with depth to curb heat gain
- Inland climates: a bit more depth to counter dry, chilly nights
- Highveld: greater thickness to fend off late-evening cool snaps
Energy efficiency incentives related to insulation depth
In SA homes, up to 30% of heat escapes through the attic when ceiling insulation depth is skimpy, a stat that turns planning into a matter of politics and practicality! Code and standards in South Africa shape attic work long before the first brick is laid, with SANS 10400-XA tying energy performance to protection and comfort and guiding how ceiling insulation depth is treated during planning and inspection. Compliance ensures a tighter envelope and predictable bills.
Energy efficiency incentives related to insulation depth exist at municipal and national levels, nudging homeowners to upgrade. The ceiling insulation depth can unlock rebates or easier permit processing, turning a stiff upfront cost into a smarter long-term move.
- Minimum thickness requirements by climate and local amendments
- Moisture management and vapor-control guidance for coastal zones
- Inspection checklists focusing on depth, gaps, and air leaks
Attic work is more than numbers—it’s resilience, comfort, and a quieter house.
Practical guidelines for retrofit projects
South African homes lose a surprising share of warmth through the attic—up to 30% in some houses when the ceiling insulation depth is skimpy. Code and standards steer attic work long before a single brick is laid. SANS 10400-XA links energy performance to protection and comfort, guiding how insulation depth is treated during planning and inspection. Compliance tightens the envelope, reduces unpredictable bills, and makes energy savings feel like a natural consequence rather than a gamble.
Regional guidelines translate that framework into retrofit reality—balancing climate, moisture risk, and what inspectors expect at the point of audit. Attic projects become a dialogue about resilience and comfort, where the depth of insulation quietly underpins a quieter, warmer home!
Common mistakes when choosing depth
In the shadowed attic, heat leaks that haunt homeowners—up to 30% in some South African houses—are won or lost by the ceiling insulation depth. Code and standards govern this delicate theatre, guiding planning and inspection long before a brick is laid.
SANS 10400-XA anchors energy performance to protection and comfort, and regional guidelines translate that framework into practical retrofit expectations. Attic work becomes a quiet negotiation between climate, moisture risk, and what inspectors expect at audit time.
Common mistakes when choosing depth include:
- Guessing without measured current depth
- Ignoring hidden air leaks that undermine insulation
- Over-simplifying to a blanket depth for all climates
- Failing to account for moisture and ventilation risks
Let ceiling insulation depth anchor the envelope, where comfort and energy savings emerge with a stubborn, spectral certainty.
Materials and installation methods that affect insulation depth
How different insulation types influence required depth
That quiet truth is this: “Heat climbs where it can,” a seasoned roofer from the Karoo once told me. In practical terms, ceiling insulation depth is shaped as much by the material you choose as by how you install it. In South Africa’s varied climate, different insulation types demand different depths to perform well, and the space you’re filling—joist gaps, rafters, and eaves—can shift those requirements.
- Fibreglass batts: depth matches cavity thickness and batt width.
- Cellulose loose-fill: depth depends on blown density, less compaction.
- Spray foams: high R-values with far less depth.
- Mineral wool batts: similar depth needs with better sound and fire properties.
- Reflective foil barriers: depth reduced when radiant protection is used.
Beyond the material itself, installation methods—including air sealing, alignment with joists, and avoiding compression—shape the true ceiling insulation depth and the room’s comfort.
Vapor barriers and air sealing impact on effective depth
A full 30% of heat escapes through ceilings when the ceiling insulation depth is skimpy, and South Africa’s climate makes that sting twice. In the field, I see that daily. Materials matter: fibreglass batts fill the cavity, cellulose relies on blown density, and spray foams deliver high R-values with less depth. Mineral wool offers similar depth with better sound and protection, while reflective barriers trim the need even more.
Vapor barriers and air sealing are the real depth multipliers. If moisture bypasses a barrier or penetrations aren’t sealed, the insulation behaves like a hollow shell—thin where it matters.
- Air sealing around fixtures
- Avoid compressing materials
- Keep vapor barrier continuous
Do it right and your insulation translates into real comfort, not just a visual thickness.
Installation best practices to achieve uniform depth
That stat isn’t marketing fluff: a full 30% of heat escapes through ceilings when ceiling insulation depth is skimpy, and SA’s climate makes that sting twice. Material choice and installation quality determine how deep the warmth actually stays—without turning your roof into a wind tunnel.
Fibreglass batts, cellulose, spray foams, mineral wool, and reflective barriers each offer different ceiling insulation depth outcomes. When you compare options, higher-density or higher-R-per-inch choices can deliver the same comfort with less overall depth.
Installation should aim for uniform depth across the ceiling, with continuous layers where it matters and careful treatment of edges and penetrations. Done right, your attic wallflower becomes a star player in home comfort and energy bills.
Safety and working clearances when installing thick insulation
Heat moves where ceilings are thin, and in South Africa that sting is all too familiar. About 30% of heat leaks through ceilings when depth is skimpy, turning comfort into a back-and-forth battle with the calendar and the utility bill.
Materials and installation methods shape the actual ceiling insulation depth that endures. Fibreglass, cellulose, spray foam, mineral wool, and reflective barriers each bend warmth differently; high-density or high-R-per-inch options can deliver the same comfort with less overall depth, provided depth stays uniform at edges and penetrations.
Safety and working clearances matter just as much as the physics. Take care around electrical fixtures, vents, and chimneys; PPE and code adherence keep ceiling insulation depth intact while protecting the attic crew.
- Maintain clearances around fixtures
- Seal penetrations and gaps
- Wear PPE and follow codes
Measuring, testing, and verifying depth after installation
How to verify depth with simple measurements
Warmth is more than a feeling—it’s a measurement. In South Africa, the ceiling insulation depth you achieve after installation often decides whether a room stays inviting or slips toward draftiness. A precise read on this depth turns an ordinary attic into a fortress of comfort.
Measuring and testing after the fact is less about heroics and more about consistency. A comparison of actual thickness with the design target—and awareness of pockets of compression near fixtures—forms a quiet audit that supports ensuring the depth meets the intended performance across seasons.
- Visual uniformity across the attic plane
- Documentation aligns with the installed thickness
- Edge and fixture zones checked for gaps
Using thermal imaging and other diagnostic tools
In South Africa, a room’s warmth often hides in the attic’s quiet ceiling. The ceiling insulation depth you achieve shapes whether heat stays inviting or slips into drafts. A precise read on this depth transforms an ordinary roof space into a fortress of comfort.
- Thermal imaging to map temperature gradients
- Infrared thermography for surface heat flow
- Moisture and density checks near fixtures
Measuring after installation isn’t heroic work; it’s a quiet audit. Thermal imaging reveals cold pockets and compression near fixtures. Other diagnostic tools, like infrared thermography, moisture meters and density checks, illuminate how the depth performs.
Seeing is believing: visual uniformity across the attic plane and the documentation align with the installed thickness, while edge and fixture zones reveal any gaps—keeping the ceiling insulation depth faithful to its promise.
When to re-check and adjust after seasonal changes
Post-install verification isn’t glamorous, but it’s the hinge between promise and reality. The ceiling insulation depth you achieved should read as a quiet, even blanket above the living space, holding warmth in and drafts at bay.
When the season turns, the quiet attic can speak. Look for signs that a re-check is warranted:
- Shifts in attic temperature patterns that betray uneven cooling or heating
- New drafts near fixtures or penetrations
- Moisture hints or condensation in roof spaces
Seasonal changes remind us that depth is a living measure, not a one-time stamp on the ceiling.
Maintenance tips to maintain effective depth over time
Measuring is more than pulling a ruler and squinting at a foggy attic. After installation, we verify a steady, uniform layer that behaves like a quiet blanket over living spaces. This is where ceiling insulation depth becomes a living metric, not a badge on the ceiling.
To keep that depth honest, watch for these signals:
- Shifts in attic temperature patterns suggesting uneven cooling or heating
- New drafts around fixtures or penetrations
- Moisture hints or condensation in roof spaces
Seasonal rhythms remind us that depth needs respectful maintenance. Regular checks, mindful air sealing, and cautious dusting help sustain performance without turning into a full-on retrofit. A well cared-for attic where the blanket remains even translates into steadier comfort and lower energy bills over time.