Understanding Ceiling Insulation and Its Importance
What Is Ceiling Insulation?
In the shadowed corridors of our homes, ceiling insulation whispers secrets of warmth and silence—yet, like all things wrought by time, it can become a burdensome relic. Understanding ceiling insulation is vital; it is the unseen barrier that traps heat during winter’s icy grip and keeps summer’s oppressive heat at bay. This fragile, fibrous layer is more than mere comfort—it’s an essential guardian of energy efficiency, quietly shaping our living spaces.
But there comes a moment when this guardian turns against us, deteriorating or becoming contaminated. The process of ceiling insulation removal reveals the true state of this crucial barrier. Often, old insulation can become damp, mould-ridden, or simply ineffective, demanding brave and meticulous extraction. Whether driven by health concerns or the pursuit of better insulation, knowing the intricacies of ceiling insulation removal ensures the task is handled with precision and care.
- Assessing the integrity of existing insulation
- Identifying hazards such as asbestos or mould
- Choosing the appropriate method for removal
In the dim light of renovation, the removal of ceiling insulation is more than a mundane task—it’s a ritual of renewal, a step into a brighter, more energy-efficient future. Only through understanding its importance can one truly appreciate the significance of this delicate, yet vital, process.
Benefits of Proper Ceiling Insulation
Understanding ceiling insulation is like uncovering the hidden heartbeat of a home. It’s the silent guardian that keeps warmth in during winter and shields against relentless summer heat. When maintained properly, ceiling insulation enhances energy efficiency, cutting costs and reducing your carbon footprint. Yet, over time, this vital barrier can become compromised, turning from a protective layer into a potential health hazard.
Engaging in ceiling insulation removal isn’t just about stripping away old material; it’s a journey of renewal. This process allows us to assess the true condition of your insulation, ensuring it still performs its vital role. Often, old insulation can be damp, laden with mould, or riddled with contaminants like asbestos—each posing unique hazards. Choosing the correct method for removal is crucial, and sometimes, specialised techniques are necessary to manage hazardous materials safely.
Proper ceiling insulation removal opens the door to a more efficient and healthier living space. It’s an essential step towards revitalising your home’s thermal integrity, ensuring you enjoy comfort and peace of mind all year round. Whether upgrading or replacing, understanding the significance of this process helps you appreciate the delicate balance between insulation’s protective power and the need for meticulous care during its removal.
Common Types of Ceiling Insulation
Understanding ceiling insulation is like unlocking the secret to a home’s hidden warmth and coolness. It acts as an invisible barrier, balancing the thermal dance between external elements and your living space. Proper ceiling insulation ensures that winter’s chill stays outside and summer’s heat remains at bay, creating a sanctuary of comfort. But over years, this vital shield can become compromised, turning from a protective ally into a source of health hazards or inefficiency.
There are several common types of ceiling insulation, each with unique characteristics. Fibreglass batts are perhaps the most recognised, offering a flexible and cost-effective solution. Loose-fill insulation, often made from cellulose or mineral wool, is blown into place, filling every crevice. Rigid foam boards provide a high insulation value in a compact form. When considering ceiling insulation removal, recognising these types helps determine the safest and most effective method for your home.
In some cases, the presence of hazardous materials like asbestos necessitates specialised removal techniques. Engaging professionals ensures that each layer is carefully assessed and removed with precision, maintaining safety standards. Whether upgrading or replacing, understanding the nuances of ceiling insulation types is essential for a seamless transition to a healthier, more energy-efficient home.
Signs You Need to Remove Ceiling Insulation
Indicators of Insulation Damage or Inefficiency
There’s an unsettling quiet that often signals trouble in your home’s insulation system. If you notice unexplained increases in energy bills, it’s a clear warning sign that ceiling insulation removal might be necessary. Over time, insulation can deteriorate due to moisture, pests, or age, transforming from a protective barrier into a breeding ground for mould and pests. Such damage not only compromises thermal efficiency but also poses health risks.
Indicators of insulation damage or inefficiency can be subtle but telling. For instance, a persistent musty odour or visible mould patches on your ceilings should never be ignored. These symptoms suggest that moisture has infiltrated the insulation, rendering it useless and potentially harmful. Additionally, if your home feels drafty despite high-quality windows and doors, the ceiling insulation may have become compressed, displaced, or degraded, impairing its insulating capabilities.
Recognising these signs early can save you from escalating energy costs and health hazards. Sometimes, the only way to restore your home’s comfort and safety is through professional ceiling insulation removal. This process not only clears out the damaged material but also prepares the space for new, high-performance insulation that restores efficiency and peace of mind. Remember, neglecting these indicators could lead to significant structural and health issues in the long run.
Inspection Tips for Ceiling Insulation
In the shadowed corners of your home, signs of insulation decay often whisper their warning before chaos erupts. Cracked ceilings, persistent odours, or inexplicable draughts are not mere inconveniences—they are the telltale signs that ceiling insulation removal may soon be unavoidable. When moisture and pests infiltrate the once-protective barrier, they turn your attic into a battleground of mould and decay, threatening both your health and your home’s integrity.
To unveil the true state of your ceiling insulation, consider a careful inspection. Look for dark patches, dampness, or a musty scent that lingers in the air—a sinister hint that the material has succumbed to rot. An additional clue lies in the efficiency of your heating; if bills rise despite your best efforts, it suggests your insulation is no longer performing its silent duty.
- Examine the ceiling for visible mould or water stains.
- Check for compressed or displaced insulation material.
- Listen for unexplained drafts that seem to seep through the attic space.
Such subtle yet ominous indicators beckon a professional approach—ceiling insulation removal becomes not just necessary but vital. Only through this process can the space be cleansed of the damaged remnants, paving the way for high-performance insulation to breathe new life into your home’s defence against the elements. Ignoring these signs risks unleashing long-term structural decay and health hazards—an ominous toll that no homeowner should bear in silence.
When to Consult a Professional
In the silent corridors of your home, subtle signs can signal that ceiling insulation removal is overdue. When your energy bills spike unexpectedly or the ceilings emit a musty odour, it hints at a deeper malaise lurking behind the plaster. These are not mere inconveniences; they are the whispers of a compromised insulation system, crying out for professional intervention.
Visible mould, water stains, or compressed insulation material serve as stark indicators that your ceiling’s thermal barrier has been breached. Unexplained drafts that seem to seep from the attic are another ominous sign, suggesting that the insulation has lost its efficacy. Recognising these signs early can prevent further decay and health hazards, making ceiling insulation removal an essential step.
When these symptoms appear, it’s time to consider consulting a professional. An expert can assess whether the damaged insulation needs to be carefully removed and replaced, ensuring your home remains a sanctuary of comfort and safety. Ignoring these signals risks long-term structural decay and the insidious spread of mould and pests—troubles no homeowner wishes to face unprepared.
Preparing for Ceiling Insulation Removal
Gathering Necessary Tools and Equipment
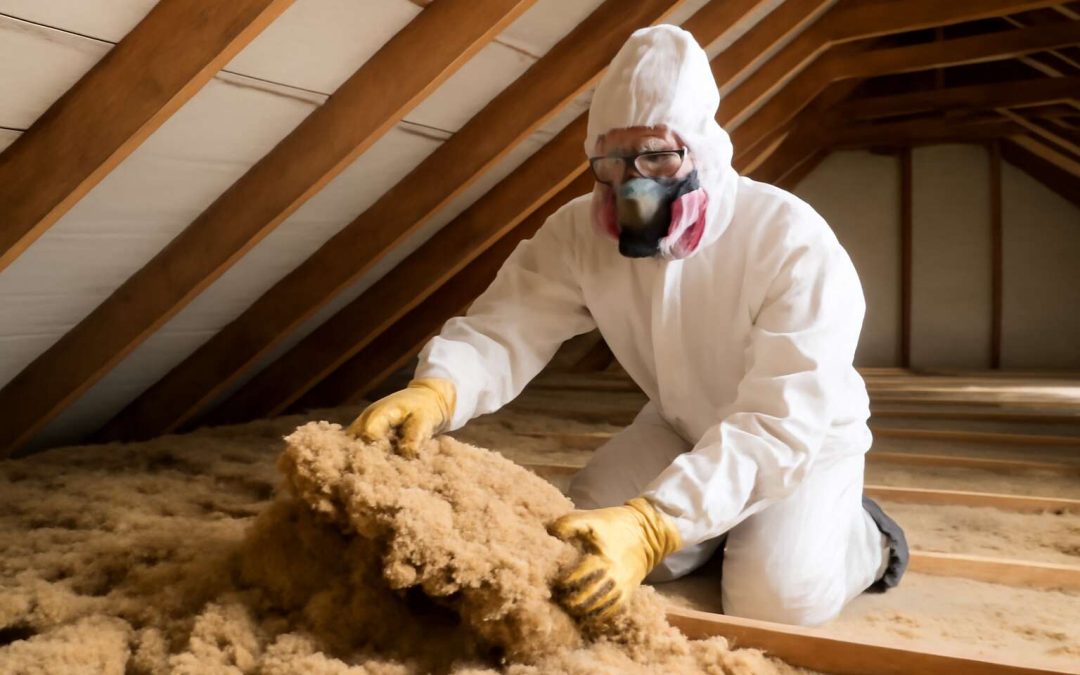
Embarking on the journey of **ceiling insulation removal** demands more than mere enthusiasm; it requires a carefully curated arsenal of tools and equipment. Imagine confronting a task that’s as delicate as a courtier’s etiquette, yet as vital as a monarch’s decree. The first step is gathering the essentials—think sturdy gloves, a reliable dust mask, and protective eyewear—because no one wants a surprise asbestos party or a cloud of insulation fibres invading their personal airspace.
For efficiency and safety, a few specialised items can transform this chore from arduous to manageable. A high-powered vacuum, for instance, makes swift work of loose insulation, while a utility knife or insulation saw helps in trimming stubborn sections. To keep things tidy, a set of plastic sheeting and tape will contain debris and prevent it from becoming a household hazard. When planning your ceiling insulation removal project, remember: the right tools are your best allies in navigating the often unpredictable landscape of insulation materials.
Securing Permits and Regulations
Every venture into the realm of ceiling insulation removal must be guided by the map of regulation and the compass of legal compliance. Without proper permits, even the most meticulously planned project risks becoming a bureaucratic labyrinth, delaying progress and inviting unwelcome scrutiny. In many regions, regulations surrounding insulation removal are stringent—particularly when dealing with materials like asbestos—demanding adherence to safety standards that safeguard both occupants and workers alike.
Securing the necessary permits is more than a bureaucratic formality; it’s a vital shield against future liabilities. Before embarking on this delicate task, consult local authorities or regulatory bodies to understand the precise requirements. Often, an inspection is mandated, ensuring that the insulation removal process aligns with environmental and safety standards. Remember, compliance isn’t merely about legality; it’s about respecting the integrity of your space and health.
When preparing for ceiling insulation removal, consider this essential checklist:
- Identify regional regulations concerning asbestos or hazardous materials
- Obtain necessary permits before commencing work
- Schedule inspections if required by local authorities
- Engage certified professionals for hazardous material handling
Protecting Your Home and Personal Safety
Preparing for ceiling insulation removal is a crucial step that often gets overlooked amidst the promise of a cleaner, safer home. It’s not merely about wielding a sledgehammer; it’s about safeguarding both your property and personal well-being with meticulous preparation.
First, ensure you have the right safety gear—think dust masks, protective goggles, and coveralls. This isn’t the moment to channel a fashionista; it’s about shielding yourself from potentially hazardous fibres or dust. Next, clear the space beneath the ceiling to prevent damage to furniture or belongings, and lay down protective sheeting for added precaution.
Given the sensitive nature of some insulation materials, consulting local authorities or regulatory bodies about hazardous material handling is wise. When dealing with suspected asbestos, engaging certified professionals becomes non-negotiable, as they possess the specialised expertise necessary to navigate the labyrinth of safety standards.
To streamline your efforts, consider this essential checklist:
- Identify regional regulations concerning hazardous materials
- Gather all necessary permits
- Arrange for professional inspection if required
- Secure appropriate protective equipment
In the realm of ceiling insulation removal, preparation isn’t just prudent—it’s paramount. Ensuring every box is ticked before the first removal makes the entire process smoother, safer, and ultimately more successful.
Step-by-Step Guide to Removing Ceiling Insulation
Safe Removal Practices
Removing ceiling insulation might seem straightforward, yet it demands a meticulous approach rooted in safety and precision. An improper removal process can release hazardous fibres into the air, risking health and safety. It’s essential to approach ceiling insulation removal with patience and respect for the materials involved.
Begin by donning appropriate protective gear—respirators, gloves, and eye protection—since insulation particles are notorious for their irritant properties. Carefully access the ceiling cavity, ensuring that the workspace is well-ventilated to minimise airborne fibres. Use specialised tools like a insulation removal vacuum or a sturdy broom to gently loosen and gather the material.
For larger areas, a systematic method can streamline the process:
- Disconnect power sources to avoid electrical hazards.
- Cover furniture and flooring to prevent contamination.
- Work methodically, section by section, to control dust dispersion.
The goal is not only to remove the insulation but to do so with a conscious respect for your environment and health. Proper techniques in ceiling insulation removal ensure the integrity of the space is preserved while safeguarding well-being.
Handling Different Types of Insulation
Embarking on a ceiling insulation removal journey is like stepping into a hidden world beneath your roof. The process varies depending on the type of insulation, each demanding its own approach and care. For fibreglass or mineral wool, gentle handling is crucial to prevent fibres from becoming airborne and causing irritation. Conversely, foam insulation requires a different strategy—careful disassembly to avoid damaging the ceiling structure.
When handling different types of insulation, it’s beneficial to stay methodical. Start by removing any loose or damaged sections, then gradually work through the area with specialised tools like a vacuum designed for insulation removal or a sturdy broom. Remember, patience and precision are your allies in ensuring a safe and effective ceiling insulation removal process.
Proper Disposal of Old Insulation
Removing ceiling insulation is a meticulous task that requires patience and a careful approach. Once you’ve identified the insulation to be removed, the next step is ensuring proper disposal to keep your home safe and environmentally friendly. Old insulation, especially if it contains fibres or contaminants, should be handled with care to prevent airborne particles and potential health hazards.
Begin by sealing off the work area to minimise dust spread. Use a sturdy vacuum designed for insulation removal, which helps capture fibres and debris efficiently. Collect the old insulation in heavy-duty rubbish bags, making sure to double-bag if necessary to prevent leaks. It’s also wise to check local regulations for disposal—many regions have specific guidelines for waste containing insulation materials.
- Wear protective gear such as gloves, masks, and goggles to shield yourself from fibres and dust.
- Ensure the old insulation is completely contained before removing it from the attic or ceiling space.
- Transport the waste to designated disposal facilities to prevent environmental contamination.
Proper disposal of old insulation not only safeguards your health but also ensures that your ceiling insulation removal project complies with environmental standards. Taking these steps makes the process smoother and leaves your home safe for future renovations or insulation upgrades. Remember, the right approach transforms a daunting task into an achievable project—one that enhances your living space’s comfort and energy efficiency.
Tips for a Successful Insulation Removal Process
Avoiding Common Mistakes
A meticulous approach to ceiling insulation removal can be the difference between a seamless upgrade and a costly mistake. With over 60% of energy loss occurring through poorly maintained or outdated insulation, every step counts. The key to success lies in avoiding common pitfalls that can compromise safety or efficiency.
Begin by double-checking your tools and equipment—insulation removal requires precision and care. A sudden oversight, like neglecting to wear proper protective gear, can lead to health hazards. When handling different types of insulation, such as fibre or spray foam, understanding their unique removal challenges helps prevent accidental damage or contamination.
Remember, patience is paramount. Rushing through the process increases the risk of leaving behind debris or damaging ceiling structures. For a truly successful ceiling insulation removal, a careful, methodical approach—paired with attention to detail—ensures optimal results and paves the way for effective new insulation installation.
Cleaning and Inspecting the Ceiling Area
Before embarking on ceiling insulation removal, meticulous preparation sets the foundation for success. A thorough cleaning and inspection of the ceiling area can reveal hidden issues—such as mould, leaks, or structural weaknesses—that might otherwise complicate the removal process. Take the time to identify these anomalies; neglecting them could lead to compromised insulation or safety hazards down the line.
Once the area has been cleared, consider implementing a systematic approach. For instance, an ordered sequence of steps can prevent accidental damage or oversights—like leaving behind debris or damaging ceiling joists. While inspecting, pay close attention to the type of insulation present, as this influences removal techniques and safety measures.
Incorporating a checklist or a simple numbered plan helps keep focus sharp and ensures no detail is overlooked during this delicate phase. Remember, a well-guarded workspace isn’t just about cleanliness—it’s about safeguarding your project’s integrity. Properly prepared, your ceiling insulation removal becomes not just a task, but a careful craft that honours both safety and precision.
Preparing for New Insulation Installation
Embarking on a ceiling insulation removal journey demands more than just a pair of gloves and a ventilator; it requires a meticulous mindset and a strategic approach. The success of this delicate task hinges on thorough preparation—each step an act of reverence for both safety and craftsmanship. Before diving into the physical act of removal, visualising the space as a living entity helps reveal potential hazards—hidden mould, water stains, or weakened joists—that could otherwise become hazardous pitfalls.
To streamline the process and ensure impeccable results, consider implementing a systematic plan. An ordered sequence of actions, whether it’s removing old insulation, checking for damage, or cleaning debris, keeps the workspace organised and prevents costly oversights. Pay close attention to the insulation type—whether fibre glass, mineral wool, or foam—as each demands specific handling techniques and safety precautions.
Incorporating a simple numbered checklist not only sharpens focus but also transforms a seemingly straightforward task into an act of precision. Remember, a well-prepared environment isn’t merely about cleanliness; it’s about safeguarding the integrity of your home and the safety of everyone involved. When approached with care and attention, ceiling insulation removal becomes a craft rooted in respect for the space, ensuring your project’s foundation is solid for the installation of new insulation.
Costs and Hiring Professionals for Ceiling Insulation Removal
Average Cost Breakdown
The cost of ceiling insulation removal can vary significantly depending on several factors, yet many underestimate the true investment required for a thorough job. On average, homeowners might spend between £200 and £600, but this figure can escalate if the insulation material is particularly difficult to access or if extensive repairs are necessary.
Hiring professionals for ceiling insulation removal is a decision rooted in safety and precision. Skilled experts not only ensure the job is done efficiently but also guarantee that no damage is inflicted on the ceiling structure. When selecting a contractor, consider their experience with different insulation types and their adherence to safety standards.
In terms of cost breakdown, expect to pay for both labour and disposal. The removal process involves carefully extracting old insulation, which can sometimes contain hazardous materials like asbestos, adding to the complexity and expense. Here’s a simplified overview:
- Labour charges for removal and cleanup
- Disposal fees for old insulation
- Potential additional costs for repairs or mould treatment
Understanding these elements helps in setting realistic expectations and ensuring your ceiling insulation removal project proceeds without unforeseen financial strain. Investing in professional services ultimately safeguards your home and peace of mind—an essential consideration when undertaking such an impactful task.
How to Choose a Qualified Insulation Removal Contractor
Choosing a qualified contractor for ceiling insulation removal is more than a matter of ticking boxes; it’s an investment in peace of mind and the integrity of your home. The process demands meticulous attention to detail, an understanding of different insulation types, and unwavering adherence to safety standards. A reputable professional will not only execute the task efficiently but also anticipate potential complications—such as hazardous materials—that might lurk beneath the surface.
Cost considerations play a pivotal role in the decision-making process. On average, ceiling insulation removal can cost between £200 and £600, depending on the complexity of access and the extent of repairs needed. When selecting a contractor, consider requesting a detailed quote that breaks down labour, disposal, and any additional charges, such as mould treatment or structural repairs. This transparency ensures that the true scope of the project aligns with your financial expectations.
- Verify the contractor’s experience with various insulation materials, especially if your ceiling contains hazardous substances like asbestos.
- Confirm their compliance with safety standards and industry regulations—these are non-negotiable indicators of professionalism.
- Seek out reviews and testimonials, as a history of satisfied clients often correlates with quality service.
Ultimately, engaging seasoned experts for ceiling insulation removal isn’t merely about erasing old materials; it’s about safeguarding your home’s future while navigating a process that, if handled improperly, could lead to costly repercussions. The nuanced decision to hire a professional becomes a safeguard, ensuring the job is done right the first time—an investment that pays dividends in peace of mind and long-term home efficiency.
DIY vs. Professional Services
Embarking on a journey of ceiling insulation removal is not merely a task of stripping away old materials; it’s an investment in your home’s future comfort and efficiency. The costs involved can vary widely, typically ranging from £200 to £600, influenced by access difficulty and the scope of repairs. Engaging a professional ensures that the removal process is handled with precision, safety, and respect for the integrity of your home. Their expertise can often prevent costly mishaps—especially when hazardous materials like asbestos are present.
While some homeowners might be tempted to undertake DIY ceiling insulation removal to save money, the risks often outweigh the benefits. Without proper training and equipment, you could inadvertently expose yourself and your family to health hazards or damage the ceiling structure. For complex projects, especially those involving potentially hazardous substances or intricate access points, hiring seasoned professionals is a wiser choice. They bring specialized tools and knowledge, making the process smoother and more secure—an investment in peace of mind that truly pays dividends.
Post-Removal Considerations and Next Steps
Replacing or Upgrading Your Ceiling Insulation
Once the last remnants of old insulation have been carefully extracted, the space must be allowed to breathe—an unspoken promise of renewal and readiness. Post-removal considerations are vital, for they set the stage upon which the symphony of upgrading or replacing your ceiling insulation will unfold. A thorough inspection should follow, seeking out hidden damages, mould, or signs of moisture that might have been concealed beneath the old insulation’s shadow. This is the moment to assess the condition of rafters, wiring, and the ceiling structure itself, ensuring an unblemished canvas for the new layer of insulation.
Next steps often involve the decision to replace or upgrade your ceiling insulation, tailoring the thermal barrier to meet modern standards and your home’s unique needs. An effective upgrade enhances energy efficiency, reducing heating costs and environmental impact. For many, choosing the right type—be it mineral wool, foam, or cellulose—becomes a pivotal choice. To facilitate this transformation, some opt for professional installation, appreciating the expertise that guarantees safety and optimal performance. Ultimately, this phase is not merely about insulation but about forging a resilient, comfortable sanctuary that stands the test of time.
Ensuring Energy Efficiency and Safety
Once the last remnants of old ceiling insulation have been gently extracted, the space is left bare—an unspoken invitation for renewal. This moment is pivotal; it’s where careful post-removal considerations can truly make a difference. Ensuring the ceiling is free of hidden damage, mould, or moisture is essential to create a pristine canvas for the new insulation. An inspection of rafters, wiring, and the ceiling structure itself can reveal underlying issues that might otherwise undermine the upgrade process.
Addressing these concerns now helps safeguard your home’s energy efficiency and safety. If any irregularities are spotted, they must be resolved before proceeding to install fresh insulation. This might involve repairing compromised structures or addressing moisture sources that could lead to mould growth down the line. It’s a moment to pause and reflect—making sure your space is prepared for the next chapter of thermal comfort and environmental responsibility.
Next, consider the pathway forward—be it replacement or upgrading your ceiling insulation. For many homeowners, this involves selecting the optimal insulation material such as mineral wool, foam, or cellulose, each offering unique benefits tailored to your home’s needs.
- Assessing the condition of existing wiring and structural components
- Ensuring moisture barriers are intact
- Deciding on the insulation type that best aligns with energy efficiency goals
The journey towards a more energy-efficient home hinges on these crucial steps. Whether you choose to undertake ceiling insulation removal with professional assistance or opt for a do-it-yourself approach, ensuring safety and quality remains paramount. In the end, this phase isn’t merely about removing old insulation; it’s about forging a resilient, cosy environment where warmth is preserved, and energy wastage becomes a thing of the past.
Long-term Maintenance Tips
Once the old ceiling insulation has bid farewell, it’s time to give your ceiling a thorough once-over. Post-removal considerations are crucial to ensure that no hidden damage, mould, or moisture lurk behind the scenes. A meticulous inspection of rafters, wiring, and the overall ceiling structure can reveal underlying issues that might sabotage your energy efficiency goals. Think of it as giving your home a health check-up—better to catch problems early than to deal with mouldy surprises later.
Addressing these concerns now not only preserves your home’s structural integrity but also sets the stage for a successful insulation upgrade. If any irregularities are spotted, such as damp patches or compromised timber, they should be rectified before installing fresh insulation. This might involve sealing moisture sources or repairing damaged framing, ensuring your home remains cosy and energy-efficient for years to come.
When considering the next steps—whether to replace or upgrade your ceiling insulation—evaluate your options carefully. Materials like mineral wool, foam, or cellulose each have their merits, and selecting the right type can optimise your home’s thermal performance. Ensuring that existing wiring is safe, moisture barriers are intact, and structural components are sound, forms the backbone of a resilient upgrade process.
Long-term maintenance tips are equally essential. Regularly inspecting your ceiling insulation for signs of wear or moisture ingress can help prevent future headaches.
- Keep an eye out for damp patches or mould growth.
- Check for any sagging or compressed insulation.
- Ensure that ventilation remains unobstructed to prevent moisture build-up.
Staying vigilant ensures that your investment in ceiling insulation removal and replacement continues to pay dividends in energy savings and comfort—because a home that breathes well is a home that lasts.