Understanding Ceiling Insulation Batts
Types of Ceiling Insulation Batts – Different materials and their insulation properties
Ceiling insulation batts come in a delightful array of materials, each whispering its own tale of thermal magic and environmental harmony. Understanding these varieties is essential for mastering ceiling insulation batts installation and creating a cozy, energy-efficient sanctuary. The choice of material influences not only the R-value—the measure of thermal resistance—but also how seamlessly the batts integrate into your roof’s narrative of comfort.
Natural fibres like wool and cotton evoke a sense of earth’s warmth, offering excellent insulation properties while being environmentally friendly. Conversely, mineral wool batt insulations, crafted from volcanic rock or slag, provide robust fire resistance and soundproofing, making them a popular choice for South African homes seeking resilience and serenity. Additionally, foam-based batts, often made from polyurethane or polystyrene, bring a high R-value in slender profiles—perfect for spaces where thickness is at a premium.
When selecting your materials, consider the specific needs of your roof and climate. Whether it’s the breathable qualities of natural fibres or the moisture resistance of synthetic options, each type of ceiling insulation batts offers a unique symphony of benefits—key notes in the melody of effective ceiling insulation batts installation.
Benefits of Proper Ceiling Insulation – Energy efficiency, cost savings, and comfort
In the grand tapestry of home improvements, proper ceiling insulation batts installation often plays the subtle yet pivotal role of a masterful conductor. When expertly executed, it transforms a mundane roof into a fortress of comfort, turning chilly mornings into warm, inviting spaces. The benefits extend beyond mere warmth; they ripple into energy efficiency, offering a significant reduction in heating and cooling costs—an appealing prospect in South Africa’s diverse climate zones.
Think of your home as a carefully curated sanctuary—each element working in harmony. Effective ceiling insulation batts installation ensures minimal thermal escape, maintaining a steady indoor temperature regardless of outside whims. This not only enhances comfort but also prolongs the lifespan of heating and cooling systems, translating into tangible savings. For homeowners, this blend of coziness and cost-effectiveness is nothing short of a revelation.
Moreover, a well-insulated roof helps curb energy wastage, aligning your home with environmentally conscious pursuits. The key to unlocking these advantages lies in meticulous installation, where every batt must sit snugly against the rafters, free from gaps or compression. When done correctly, it’s an investment that pays dividends in comfort, savings, and ecological harmony—making ceiling insulation batts installation an essential chapter in the story of sustainable living.
Choosing the Right Batts for Your Home – Factors to consider such as R-value, size, and material
Choosing the right ceiling insulation batts for your home is a decision that requires careful consideration, yet it’s often shrouded in mystery. The key lies in understanding what truly makes a batt suitable for your specific needs. As the South African climate varies dramatically from coastal heat to inland chill, selecting insulation with the appropriate R-value becomes paramount. An R-value measures thermal resistance—higher values mean better insulation performance.
Size matters too. It’s essential to ensure the batts fit snugly between your rafters without gaps or compression, which can compromise their effectiveness. Material choice further influences insulation quality; whether mineral wool, fiberglass, or eco-friendly options, each has unique properties that can impact energy efficiency and durability. Carefully weighing these factors ensures your ceiling insulation batts installation results in maximum comfort and long-term savings.
- Assess your home’s climate zone to determine the ideal R-value.
- Measure rafter spans accurately to select batts that fit perfectly.
- Consider the material’s fire resistance, moisture handling, and environmental impact.
In the end, matching the right batt to your home is like solving a complex puzzle—each piece vital for a harmonious, energy-efficient sanctuary. When executed with precision, ceiling insulation batts installation transforms your roof into a silent guardian, shielding you from the unpredictable elements outside.
Preparation for Insulation Batts Installation
Safety Precautions – Personal protective equipment and handling tips
Embarking on a ceiling insulation batts installation adventure requires more than just laying down material—it demands a vigilant eye on safety. Before stepping into the attic, it’s essential to gear up with the right personal protective equipment (PPE). Think sturdy gloves, a dust mask, and goggles to shield against irritants and airborne particles that can turn a simple task into a hazardous ordeal. Remember, attic spaces can harbor hidden surprises, from insulation fibres to electrical wiring, so caution is key!
Handling insulation batts with care ensures both safety and efficiency. Always unroll batts gently to avoid tearing, which can release fibres into the air. When cutting the batts, use a serrated knife and work in a well-ventilated area to prevent inhalation of loose fibres. For optimal ceiling insulation batts installation, keeping the workspace tidy and clutter-free minimizes trip hazards and allows for precise placement. As you progress, take a moment to inspect your PPE and ensure no protective gear is compromised—your safety remains paramount in this transformative process!
Tools and Materials Needed – List of tools, batts, and accessories
Embarking on a journey of ceiling insulation batts installation requires more than just a keen eye and steady hands—it demands a carefully curated toolkit that transforms a mundane task into a symphony of efficiency. As the warm South African sun bathes homes in radiant energy, it’s easy to overlook the silent guardian of comfort tucked away in the attic. Gathering the right tools and materials is the first step in ensuring your insulation project not only enhances energy efficiency but also stands resilient against the test of time.
Before diving into the process, assemble a selection of essential items: a sturdy utility knife or serrated blade for precise cuts, a reliable measuring tape to ensure perfect fit, and protective gear such as gloves, goggles, and dust masks to safeguard against airborne fibres. For a seamless ceiling insulation batts installation, having a step ladder or scaffold to reach those lofty heights, along with a handful of fasteners or insulation supports, can make all the difference. A few accessories—such as a chalk line for marking cut lines and a spray bottle to dampen stubborn batts—add finesse to the project.
In addition to tools, the materials themselves form the backbone of your insulation endeavor. Carefully select batts that suit your specific needs—considering R-value, size, and material—while ensuring they are compatible with existing ceiling structures. The right combination of tools and materials creates a harmonious environment where safety, precision, and durability converge, making your ceiling insulation batts installation a truly rewarding experience!
Assessing Your Ceiling Space – Measuring and identifying insulation areas
Before embarking on your ceiling insulation batts installation, it’s crucial to assess your attic space thoroughly. This step ensures you have a clear understanding of the areas that need insulation and helps you plan your project with precision. Take a moment to measure the length and width of your ceiling joists. Accurate measurements will guide you in selecting the right size of batts and prevent wastage or gaps that could compromise thermal performance.
Next, identify the specific zones that require insulation. Often, older homes may have uneven coverage or missing sections, especially around vents, light fixtures, or between joists. For a seamless fit, consider marking these areas with a chalk line. This simple step provides a visual guide during installation, making the process smoother and more efficient. Remember, thorough preparation is the foundation of successful ceiling insulation batts installation, ensuring your home stays warm in winter and cool in summer.
Step-by-Step Guide to Installing Ceiling Insulation Batts
Removing Old Insulation (if necessary) – Proper disposal and cleaning techniques
Removing old insulation is often an overlooked yet crucial step in the ceiling insulation batts installation process. It’s more than just a matter of peeling away worn or compacted material; it’s an act of renewal—an opportunity to assess the true state of your ceiling’s health. When old insulation is left to linger, it can hinder the effectiveness of the new batts and compromise your home’s energy efficiency. Proper disposal isn’t just about tossing it in the bin; it’s about handling it responsibly, especially if it contains asbestos or other hazardous substances, which require special disposal procedures.
Before you begin, ensure you wear personal protective equipment—gloves, masks, and goggles—to shield yourself from dust and potential irritants. Carefully remove the old insulation, taking care not to disturb the ceiling structure. Dispose of the debris in accordance with local regulations, which may involve sealing it in heavy-duty rubbish bags or arranging for hazardous waste collection if necessary.
Once the old material is cleared, give the ceiling space a thorough cleaning. Removing dust and debris not only prepares the surface for the new ceiling insulation batts installation but also maximizes the insulation’s effectiveness in maintaining thermal comfort. Remember, the integrity of your home’s insulation depends on this meticulous prep work—skimp on it at your peril!
Preparing the Ceiling Joists – Ensuring a clean, unobstructed space
Preparing the ceiling joists before installing ceiling insulation batts is a vital, almost magical step in transforming your home’s warmth and efficiency. Picture the space above your head as a blank canvas, waiting to be infused with insulation’s whispering embrace. Ensuring a clean and unobstructed environment not only allows the batts to settle perfectly but also enhances their thermal performance, making every corner of your home feel cozy and inviting.
Begin by inspecting the joists carefully, removing any debris, dust, or loose materials that could hinder the installation process. A dust-free surface acts as a silent ally in the battle against energy loss, creating a seamless barrier against the chill. If there are any obstructions such as old wiring or irregularities, address them with precision—this is the foundation upon which the magic of insulation truly works.
- Clear the space of all debris, ensuring the ceiling joists are visible and accessible.
- Check for any irregularities or obstructions that might impede the proper fitting of the ceiling insulation batts.
- Ensure that the joists are structurally sound, as they will support the new layer of insulation, creating a harmonious balance between form and function.
By meticulously preparing the ceiling joists, you set the stage for an impeccable ceiling insulation batts installation—an act of renewal that promises warmth, energy savings, and a home that feels as cozy as a snug nest in the heart of winter’s embrace. It’s not merely about fitting insulation; it’s about weaving a protective tapestry that endures through the seasons, whispering comfort into every room.
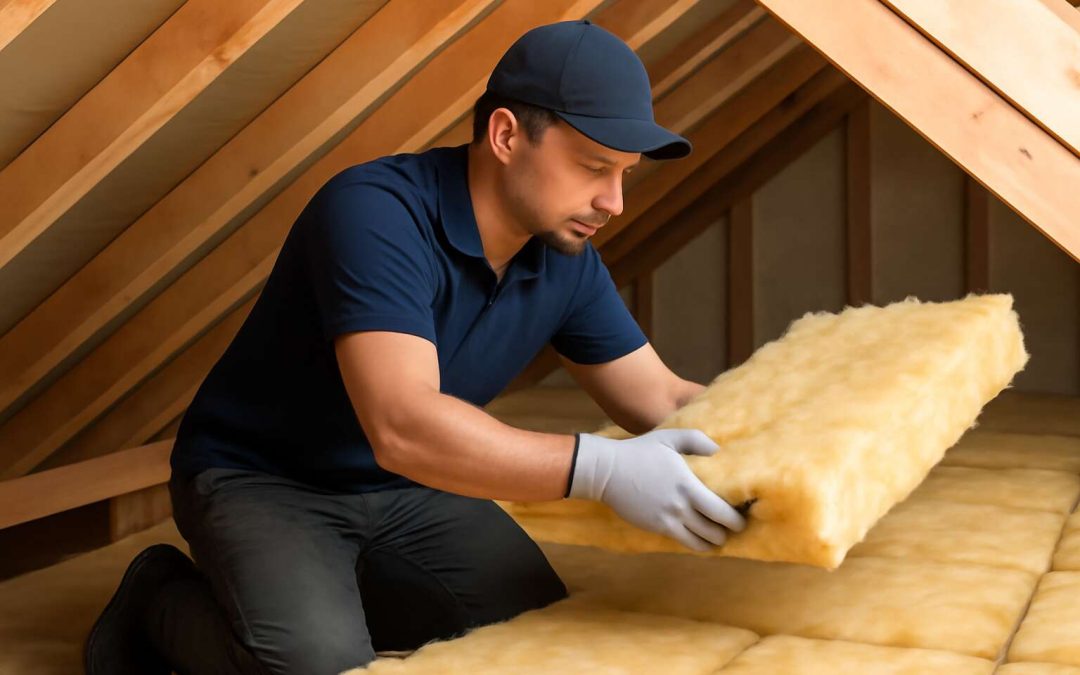
Fitting the Batts – Installation method, cutting to size, and placement
Fitting ceiling insulation batts is a delicate dance of precision and patience, where each step culminates in a sanctuary of warmth and efficiency. Once the space above your ceiling is pristine—free of dust, debris, and obstructions—the real artistry begins. Carefully measure the dimensions of your ceiling joists to ensure a perfect fit, for the integrity of your insulation depends on meticulous sizing.
Next, cut the ceiling insulation batts to the exact measurements of each section. Use a sharp utility knife and a straightedge for crisp, clean cuts that nestle seamlessly between the joists. Remember, the goal is to fill every nook and cranny without compressing the batts, maintaining their optimal R-value and thermal performance.
Gently place the batts into position, ensuring they lie flat and snug against the underside of the ceiling joists. For added efficiency, consider fitting the batts with a slight overlap or using staples or insulation supports if necessary. This careful placement not only maximizes insulation benefits but also preserves the aesthetic integrity of your ceiling, transforming your attic space into a bastion of comfort and energy savings.
Sealing and Gapping – Ensuring continuous insulation and avoiding gaps
Ensuring seamless insulation is where the magic of ceiling insulation batts installation truly unfolds. Gaps and gaps in insulation create whispers of cold that can sneak through, undermining your home’s warmth and efficiency. To cast a spell of continuous thermal protection, meticulous sealing and gapping are essential.
Begin by inspecting each batt once placed—check for any tiny spaces or compressions that might diminish R-value. Use a staple gun or insulation supports to secure the batts firmly against the ceiling joists. For small gaps, consider fitting additional strips of insulation or filling them with spray foam to eliminate cold bridges.
An effective approach involves an ordered sequence:
- Place the batts snugly between the joists, ensuring no compression occurs.
- Seal all edges with a high-quality, breathable sealant to prevent air leaks.
- Overlap batt edges slightly to avoid uncovered gaps, creating a tapestry of warmth across your ceiling.
Remember, in the realm of ceiling insulation batts installation, the devil is in the details. Proper sealing and gapping nurture a continuous layer of insulation, transforming your attic into an impregnable fortress of comfort, energy efficiency, and serenity.
Expert Tips for a Successful Ceiling Insulation Batts Installation
Ensuring Equal Coverage – Avoiding compression and overlaps
Achieving a flawless ceiling insulation batts installation hinges on attention to detail and a keen eye for uniformity. It’s tempting to rush through, but uneven coverage can compromise the thermal efficiency of your home, leading to increased energy bills and discomfort. To ensure everything fits snugly without compression or overlaps, take your time and measure precisely. Remember, compressed insulation loses its R-value, diminishing its insulating prowess. Similarly, overlapping batts can create gaps that allow heat to escape or enter where it shouldn’t.
Expert installers often recommend using the right tools—such as a sharp utility knife for cutting batts to size and a sturdy measuring tape—to streamline the process. A crucial tip is to gently press the batts into place, avoiding force that could compress the material. For long stretches, consider laying batts in a continuous, unbroken line to maximize coverage. If gaps or overlaps are unavoidable, seal them with appropriate insulation adhesive or foil tape to maintain a seamless barrier against the elements. Proper ceiling insulation batts installation isn’t just about fitting; it’s about creating a consistent, airtight cocoon that keeps your home warm in winter and cool in summer.”
Proper Ventilation – Managing airflow for safety and efficiency
Proper ventilation during ceiling insulation batts installation is vital—not just for safety, but for ensuring your home’s thermal efficiency remains uncompromised. When insulation is installed without adequate airflow management, moisture can become trapped, leading to mold growth and reduced insulating performance. A well-ventilated space allows moisture to escape while maintaining the barrier against the elements.
One essential aspect is to plan the airflow pathways carefully. For example, installing vents or soffit openings can help facilitate natural ventilation, preventing condensation buildup within the ceiling cavity. Keep in mind that sealing gaps around electrical fixtures or chimneys is equally important, as these can disrupt airflow if left unaddressed.
During ceiling insulation batts installation, consider using breathable membranes that allow moisture to escape without compromising insulation integrity. This integration ensures not only safety but also prolongs the lifespan of your insulation, maximizing its energy-saving benefits. Proper ventilation, when combined with meticulous installation, transforms a simple task into a lasting safeguard for your home’s comfort and resilience.
Dealing with Obstacles – Attics, wiring, and other obstructions
Every home holds a hidden world within its ceilings—an intricate tapestry of obstacles like tangled wiring, stubborn joists, and sometimes even remnants of old insulation. Navigating these challenges during ceiling insulation batts installation requires more than just patience; it demands a touch of craftsmanship and a keen eye for detail. When faced with obstructions, the goal is to create a seamless barrier that maximizes energy efficiency without compromising safety.
One expert tip is to approach the task with a strategic mindset—identify and address potential hurdles before beginning. For instance, carefully measure around wiring and fixtures, then tailor the batts to fit snugly without forcing. In some cases, using flexible or cut-to-fit batts can turn a tricky space into a manageable puzzle. Remember, a precise fit not only optimizes insulation performance but also prevents gaps that could undermine the entire project.
For more complex obstructions, consider utilizing specialized tools or consulting with a professional. A well-executed ceiling insulation batts installation that skillfully deals with these obstacles will stand the test of time, providing a cozy, energy-efficient haven for years to come. Once the challenges are met with ingenuity, the process transforms into an art—one that safeguards your home’s comfort with grace and precision!
Post-Installation Guidelines and Maintenance
Inspection and Quality Check – Verifying correct installation and coverage
After completing your ceiling insulation batts installation, the journey doesn’t end there. Proper post-installation guidelines and a thorough maintenance inspection are essential to ensure your effort yields optimal energy efficiency and comfort. An initial quality check can reveal overlooked gaps or compression that might diminish insulation effectiveness. Remember, even the smallest gaps can compromise the entire thermal barrier, leading to increased energy costs.
Conducting a comprehensive inspection involves examining the entire ceiling cavity for even coverage and secure placement. Look out for areas where batts might have shifted or become compressed during installation. Ensuring uniform coverage not only maximizes thermal performance but also prolongs the lifespan of your insulation investment. Additionally, verifying that ventilation pathways remain unobstructed helps prevent moisture buildup and maintains indoor air quality.
To streamline your maintenance routine, consider implementing a simple checklist:
- Check for gaps or compressed batts
- Inspect for signs of moisture or pest activity
- Ensure vents are clear and functional
Regular inspections can identify potential issues early, saving you from costly repairs later. With diligent maintenance, your ceiling insulation batts installation continues to provide warmth in winter and coolness in summer—turning your home into a sanctuary of comfort all year round!
Periodic Inspection – Maintaining insulation effectiveness over time
Once the last batts are snugly fitted into your ceiling cavity, the journey toward lasting insulation efficiency truly begins. Post-installation guidelines serve as the silent guardians of your investment, ensuring that your ceiling insulation batts installation remains optimal over time. Regular maintenance inspections are not just routine; they are vital in detecting subtle shifts or wear that could compromise thermal performance. Even minor gaps or compression can create weak points, allowing heat to escape or unwanted moisture to seep in, undermining the integrity of your home’s climate control.
To maintain the effectiveness of your ceiling insulation batts installation, consider adopting a simple yet systematic approach. An inspection checklist can include verifying that batts remain evenly distributed, confirming vents are unobstructed, and ensuring no signs of pest activity or moisture infiltration have appeared. These small, consistent checks help preserve the insulation’s longevity, ultimately safeguarding your home against seasonal temperature swings and reducing energy costs. Remember, a well-maintained ceiling insulation system is the foundation of year-round comfort and energy efficiency.
Identifying and Fixing Issues – Addressing gaps, sagging, or damage
Proper post-installation care is essential to maximize the lifespan and effectiveness of your ceiling insulation batts installation. Over time, even the smallest gaps or sagging areas can significantly diminish thermal performance. Regular inspections help identify issues early, preventing costly repairs down the line.
Look out for signs of damage, such as crushed or compressed batts, and address these promptly. Gaps or holes can let heat escape or moisture seep in, undermining your home’s insulation. If you notice sagging batts or missing sections, it’s crucial to reseat or replace them to restore continuous coverage.
A simple inspection routine can include verifying that batts are evenly distributed, checking for pest activity, and ensuring no obstructions block vents. Addressing these issues swiftly guarantees your ceiling insulation batts installation remains effective, energy-efficient, and contributes to year-round comfort.
Cost and Energy Savings from Ceiling Insulation Batts
Cost Breakdown – Materials, tools, and professional vs. DIY installation
Investing in ceiling insulation batts installation can significantly cut down your energy bills—up to 30% in some cases—making it a wise choice for homeowners seeking comfort and efficiency. The initial cost involves materials like R-value-rated batts, basic tools, and optionally, professional installation. While DIY enthusiasts may save on labor, professional installers often ensure optimal coverage, sealing, and safety compliance, which can prevent costly rework down the line.
The total expense varies depending on the size of your ceiling space and the quality of materials chosen. Materials alone typically range from R200 to R600 per square meter, with additional costs for tools and safety gear. When factoring in professional installation, expect to pay a premium but gain peace of mind knowing the job is done right. Ultimately, the savings in energy bills—especially during South Africa’s fluctuating seasons—can quickly offset the initial investment, making ceiling insulation batts installation a prudent long-term decision.
Long-term Energy Savings – Reducing heating and cooling costs
The true allure of ceiling insulation batts installation lies in its long-term financial charm. Once in place, it becomes a silent partner in your quest for lower energy bills, reducing heating and cooling costs by up to 30%—a boon for South African households navigating unpredictable seasonal shifts. The initial expenditure may seem daunting, but the savings on electricity and gas bills swiftly make up for it, transforming a modest investment into a savvy financial move.
Over time, the insulation’s ability to maintain a stable indoor climate means fewer demands on your heating systems in winter and air conditioning during summer. This translates into tangible savings month after month. For homeowners seeking efficiency without sacrificing comfort, ceiling insulation batts installation is an elegant solution that pays dividends long after the first rollout. With proper installation, these batts form an unbroken barrier against the whims of weather, ensuring your home remains cozy and energy-efficient year-round.
Environmental Benefits – Lower carbon footprint
Investing in ceiling insulation batts installation isn’t just about trimming your energy bills; it’s a green gesture with a hefty side of savings. By reducing the need for constant heating and cooling, you’re not only saving money but also shrinking your carbon footprint. Less energy consumption means fewer emissions—think of it as giving Mother Earth a well-deserved high five.
In South Africa’s unpredictable climate, ceiling insulation batts act as your home’s personal climate control wizard. They help regulate indoor temperatures, so your air conditioning and heater work less—translating into tangible savings month after month. Furthermore, choosing eco-friendly insulation options can significantly cut down your home’s environmental impact. Here’s a quick rundown of how ceiling insulation batts installation benefits the planet:
- Lower greenhouse gas emissions due to decreased energy demand
- Reduced reliance on fossil fuels for heating and cooling
- Encouragement of sustainable building practices
With the right installation, your home becomes a fortress of energy efficiency, helping you do your part in combating climate change. The long-term environmental benefits of ceiling insulation batts installation are clear—less energy wasted means a healthier planet. Plus, it’s a win-win: you save money while reducing your ecological footprint, making your household a shining example of responsible living in South Africa’s energy-conscious era.