Understanding Ceiling Light Insulation
What Is Ceiling Light Insulation?
Amidst the shadows of our homes, a silent guardian often goes unnoticed—ceiling light insulation. It’s the unseen barrier that keeps the chilling breath of winter at bay and prevents the relentless heat of summer from seeping through the cracks of our sanctuary. To truly grasp its importance, one must understand what ceiling light insulation entails. It is not merely a layer of material but a mystical fortress woven into the very fabric of your ceiling, designed to trap warmth or keep out the cold.
In essence, ceiling light insulation acts as a barrier that enhances energy efficiency and elevates comfort. It’s an essential element that shields your living space from the merciless elements lurking outside. When installed correctly, it reduces the burden on your heating and cooling systems, offering both financial savings and a more sustainable lifestyle. Understanding ceiling light insulation involves recognising the different types available, from mineral wool to foam boards, each with its own unique properties and advantages.
Sometimes, the true power of ceiling light insulation lies in its ability to transform your home into a refuge against the chaos beyond. It’s a whisper of warmth in the dead of night, a silent protector in the face of the chilling unknown. To appreciate its significance fully, one must see it not just as a practical necessity, but as a vital part of your home’s armour—an essential element in the ongoing battle against the relentless forces of nature.
Importance of Proper Insulation for Lighting Areas
Proper ceiling light insulation is often the unsung hero of energy efficiency in our homes. Without it, even the highest quality lighting fixtures can become gateways for heat loss during winter or heat gain in summer. When insulation is insufficient, it’s like leaving a window open — energy escapes, and utility bills climb. This is why understanding the importance of ceiling light insulation is crucial for maintaining a comfortable and cost-effective living environment.
In areas where lighting is installed in the ceiling, ensuring adequate insulation can make a significant difference. It’s not just about preventing drafts; it’s about creating a barrier that helps regulate indoor temperatures. By prioritising proper ceiling light insulation, homeowners can reduce reliance on heating and cooling systems, ultimately saving money and reducing carbon footprints. Recognising the different types of insulation available, such as mineral wool or foam boards, allows for tailored solutions that optimise performance in specific spaces.
Types of Ceiling Insulation Materials
Choosing the right materials for ceiling light insulation transforms an ordinary space into a sanctuary of comfort and efficiency. Each layer of insulation acts as a silent guardian, whispering warmth during winter and shielding against heat in summer. Among the array of options, mineral wool stands out as a popular favourite—its fibrous texture traps air and enhances thermal performance, making it ideal for ceiling light insulation.
Alternatively, foam boards provide a lightweight yet formidable barrier. Their rigid structure ensures minimal gaps, preventing unwanted drafts and heat transfer. These materials are not merely functional; they weave a narrative of energy conservation that can dramatically lower utility bills. To tailor insulation to specific needs, many opt for:
- Glass fibre batts for easy installation and excellent thermal properties
- Polyurethane foam panels for superior insulation in compact spaces
- Reflective foil insulations that bounce heat back into living areas
Understanding the nuances of each type enables homeowners to craft a bespoke solution, turning their ceiling light insulation into a work of subtle magic that supports both comfort and sustainability.
Benefits of Insulating Ceiling Lights
Energy Efficiency and Cost Savings
In the shadowed depths of your home’s architecture, where the whisper of cold sneaks through unseen cracks, ceiling light insulation becomes a silent guardian against the relentless encroachment of winter’s chill. This unassuming barrier not only curtails heat loss but transforms your living space into a sanctuary of warmth and comfort.
The true power of ceiling light insulation lies in its ability to elevate energy efficiency. By trapping heat that would otherwise escape through the ceiling, it reduces the workload on your heating system, leading to substantial cost savings over time. Imagine a home that breathes less cold and exhales fewer pounds of your hard-earned money!
- Reduced energy consumption
- Lower utility bills
- Enhanced indoor climate stability
The dark allure of insulation’s quiet magic is that it works tirelessly, unseen, yet profoundly felt. For those seeking both comfort and savings, ceiling light insulation is an investment in the enduring warmth of your home’s hidden heart.
Enhanced Indoor Comfort
There’s an almost poetic synergy between warmth and comfort, a silent promise that transforms a house into a haven. Ceiling light insulation acts as a vital conduit for this transformation, elevating indoor comfort to a realm where cold intrusion becomes a distant memory. When properly installed, ceiling light insulation doesn’t merely serve as a barrier; it becomes an intrinsic part of your home’s intimate dialogue with its environment, ensuring that every breath of heated air remains where it belongs—inside.
Enhanced indoor comfort isn’t just about temperature; it’s about the quality of living. With effective ceiling light insulation, fluctuations in temperature become subdued, forging a consistent atmosphere that feels inherently reassuring. This consistency fosters a psychological sanctuary, where the mind can relax, unburdened by the chaos of drafts and cold spots. In essence, ceiling light insulation provides a cocoon of stability, cocooning your living space in an embrace of warmth and peace.
Improved Acoustic Performance
In the grand orchestration of home comfort, the acoustic harmony within your living space often remains an overlooked symphony. Implementing effective ceiling light insulation not only hampers thermal loss but also acts as a formidable barrier against unwanted noise — transforming your home into a sanctuary of serenity. When properly installed, ceiling light insulation muffles the disruptive echoes and distant sounds that threaten your peace, creating a cocoon of tranquility.
This enhancement in acoustic performance is particularly valuable in bustling neighbourhoods or multi-storey buildings, where external noise infiltrates the indoor environment. An often unseen benefit of ceiling light insulation is its ability to absorb sound waves, preventing them from bouncing around your ceiling cavity. This results in a noticeable reduction in echoes and noise transfer between rooms, making conversations more private and sleep undisturbed.
For those seeking to elevate their home’s acoustic environment, consider these factors:
- Type of insulation material and its soundproofing properties
- Proper installation techniques to ensure no gaps or weak points
- Additional soundproofing elements, such as acoustic panels or sealing gaps around fixtures
By weaving these elements into your ceiling light insulation strategy, you unlock a realm where silence becomes a treasured commodity—an invisible guardian of peace that enhances every moment spent within.
Increased Safety and Fire Resistance
In the realm of home safety, the seemingly simple act of installing ceiling light insulation offers more than just energy savings. It provides a formidable shield that enhances fire resistance and elevates overall safety standards. When insulation materials are correctly chosen and meticulously installed, they act as a barrier against potential electrical fires, reducing the risk of flames spreading through the ceiling cavity. This layer of protection is especially vital in older homes where wiring may be compromised or outdated.
Furthermore, insulating ceiling lights can prevent the heat generated by bulbs from becoming a hazard. High-quality ceiling light insulation materials are designed to withstand elevated temperatures, helping to minimise the risk of overheating. For added security, consider integrating fire-resistant insulation options that have been tested and certified for safety. These precautions turn your home into a fortress, where every light fixture is safeguarded against unforeseen dangers.
To enhance safety even further, some experts recommend incorporating fire-resistant ceiling light insulation with built-in flame retardants or layering traditional insulation with protective barriers. This layered approach not only boosts safety but also fortifies your home against the unpredictable, ensuring that your sanctuary remains a secure haven for all inhabitants.
Common Insulation Materials and Techniques
Fiberglass Insulation
In the quiet hush of a well-insulated space, the choice of materials becomes a symphony of practicality and craftsmanship. Fiberglass insulation, a stalwart in the realm of ceiling light insulation, offers a delicate yet formidable barrier against the relentless march of heat loss. Its fibrous composition, composed of tiny glass threads, captures air to create an insulating shield that’s both effective and enduring.
This material is revered not only for its thermal prowess but also for its versatility. It can be fashioned into batts, rolls, or loose-fill, each variant tailored to fit the unique contours of ceiling spaces. For those seeking a seamless, professional finish, the installation of fiberglass insulation requires precision, ensuring no gap or void diminishes its insulating potential.
In the pursuit of optimal ceiling light insulation, understanding the nuances of these materials can transform a mundane ceiling into a fortress of efficiency. The choice of insulation material, after all, is the silent architect of comfort within the walls we cherish.
Foam Board Insulation
When it comes to achieving top-notch ceiling light insulation, understanding the array of common insulation materials and techniques is essential. Foam board insulation stands out as a popular choice, boasting a dense, rigid structure that provides superior thermal resistance in a relatively thin profile. Its high insulating value makes it perfect for tricky ceiling spaces where every millimetre counts. But don’t let its simplicity fool you—foam board can be a game-changer in your quest for energy efficiency.
For those who prefer a more customised approach, there are several methods to install foam board insulation effectively. Whether it’s cutting to fit snugly between joists or layering for added R-value, the key is precision. It’s worth noting that proper sealing of edges and joints with adhesive or specialised tape enhances performance, ensuring no heat sneaks out through gaps. Plus, foam board’s moisture resistance makes it a resilient choice for humid environments or areas prone to condensation, further boosting its appeal in ceiling light insulation projects.
In the grand scheme of ceiling light insulation, selecting the right materials and techniques can turn a standard ceiling into a fortress of warmth and efficiency. Foam board, with its versatility and high insulating capacity, exemplifies how innovation meets practicality. When combined with meticulous installation methods, it’s no wonder this material continues to be a favourite among insulators seeking the perfect balance of performance and ease of use.
Spray Foam Insulation
Among the pantheon of common insulation materials, spray foam insulation stands as a marvel of modern ingenuity. Its ability to expand upon application creates a seamless, airtight barrier that is perfect for ceiling light insulation. This technique not only boosts thermal efficiency but also significantly reduces air leakage, making your space more comfortable and energy-efficient. Spray foam insulation is especially beneficial in irregular or hard-to-reach ceiling areas where traditional materials may fall short.
Applying spray foam involves a skilled touch—either DIY enthusiasts with the right equipment or professional insulators. The spray is typically injected into cavities or directly onto the joists, filling every nook and cranny with ease. Its superior adhesion ensures a durable, long-lasting result that withstands the test of time. For those seeking a comprehensive approach, consider layering spray foam with other insulation types for enhanced R-value and moisture control.
When it comes to installation techniques, precision is paramount. Ensuring the spray foam is evenly distributed and fully expanded prevents gaps that can compromise the ceiling light insulation’s performance. Furthermore, sealing edges and joints with specialised tape or sealant creates an unbroken barrier against heat loss. This meticulous process transforms a standard ceiling into a fortress of warmth, demonstrating that innovation truly meets practicality in modern insulation solutions.
Reflective and Radiant Barriers
In the quest for optimal ceiling light insulation, understanding the variety of common insulation materials and techniques is crucial. Beyond traditional options, reflective and radiant barriers have gained prominence for their ability to deflect heat rather than absorb it, making them especially effective in warm climates. These barriers, often installed beneath the roof deck, work by reflecting infrared radiation, thereby diminishing heat transfer into living spaces. This approach not only enhances energy efficiency but also contributes to a more comfortable indoor environment.
When considering these advanced techniques, it’s useful to recognise some of the best materials for reflective and radiant barriers. For example, aluminium foil face insulation and reflective films are popular choices. Installation methods vary, but the key is ensuring an unbroken, airtight layer—free from tears or gaps—that maximises their effectiveness. Proper sealing with specialised tapes or sealants is essential to prevent heat loss or gain, especially in sensitive ceiling light insulation scenarios where precision truly counts.
- Reflective foils
- Radiant barriers
- Insulation wraps
While these barriers are often paired with traditional insulation types, they serve as a complementary layer that enhances overall thermal performance. When installed correctly, they act as a mirror to thermal energy, reflecting it back into the space or away from it, depending on the season. This dual-action approach—combining insulation materials like foam board or spray foam with reflective barriers—can dramatically optimise ceiling light insulation, reducing energy costs and increasing comfort year-round. After all, the true art of insulating a ceiling lies in harmony—balancing absorption, reflection, and sealing—transforming a simple ceiling into a fortress against the caprices of weather and energy loss.
Installation Methods
Choosing the right materials for ceiling light insulation can feel like navigating a labyrinth—each option promising different benefits. Traditional methods like fibreglass and spray foam remain popular, but modern innovations have introduced a new realm of possibilities. Insulation wraps and reflective barriers are now essential components, especially in climates where heat management becomes a delicate dance. These materials work differently from standard insulation; instead of absorbing heat, they deflect it, creating a formidable barrier against thermal transfer.
Installation techniques vary based on the chosen material, but the goal remains constant: create an unbroken, airtight seal. Ensuring no gaps or tears in reflective foils or radiant barriers is critical—they act as mirrors for thermal energy, reflecting it back into the space or outward, depending on the season. For a seamless fit, specialised tapes or sealants are often used, transforming ceiling light insulation into a fortress of energy efficiency. When these advanced materials are paired with traditional options, they provide a synergistic shield, enhancing overall thermal performance and ensuring your space remains comfortable and energy-efficient year-round.
Step-by-Step Guide to Insulating Ceiling Lights
Assessing Your Current Ceiling Light Setup
In the realm of home improvement, assessing your current ceiling light setup is akin to reading the room—literally. Before embarking on the journey of ceiling light insulation, one must first scrutinise the existing fixtures and their environment. Surprisingly, a significant portion of heat loss occurs through poorly insulated ceiling lights, transforming what should be a radiant haven into a chilly chamber. To begin, examine whether your ceiling lights are recessed, flush-mounted, or pendant, as each type influences insulation strategies differently.
Next, inspect the surrounding ceiling cavity for any signs of gaps, cracks, or inadequate sealing—these are the sneaky culprits that undermine your insulation efforts. A thorough assessment might involve removing light fixtures to gain unobstructed access, allowing for a meticulous evaluation of the insulation’s state. For optimal results, consider creating a checklist: measure the distance from the ceiling to the fixture, note any existing insulation material, and identify potential sites for air leaks.
By understanding your current ceiling light setup, you lay a solid foundation for effective ceiling light insulation. This step ensures that the subsequent insulation process is both targeted and efficient, ultimately transforming your space into a bastion of thermal comfort and energy efficiency.
Preparing the Work Area
Preparing the work area for ceiling light insulation requires careful attention to detail and a gentle approach. Begin by turning off the power supply at the circuit breaker—safety first, always. Carefully remove the ceiling light fixture to gain unobstructed access to the cavity beneath. This step not only helps in inspecting the current state of insulation but also prevents accidental electrical hazards.
Next, clear the surrounding space of any dust or debris that could interfere with the insulation process. If necessary, lay down protective sheets to prevent damage to your flooring or furniture. Once the area is prepped, you can assess the existing insulation materials and identify any gaps or cracks that might compromise thermal efficiency. For a thorough job, consider creating a checklist to document measurements and areas needing attention, ensuring your ceiling light insulation efforts are both precise and effective.
Choosing the Right Insulation Material
Choosing the right insulation material for your ceiling light insulation project is an art that balances practicality with enduring elegance. The ideal material should seamlessly blend thermal efficiency with safety, creating a sanctuary of comfort within your home. When selecting, consider the specific needs of your space—are you prioritising fire resistance, acoustic dampening, or perhaps moisture resistance? Each factor guides your decision, ensuring the insulation not only insulates but also enhances the overall safety and performance of your lighting area.
For a refined approach, I often recommend evaluating these options:
- Fiberglass insulation—renowned for its cost-effectiveness and ease of installation.
- Spray foam insulation—provides superior sealing capabilities, ideal for irregular or hard-to-reach spaces.
- Foam board insulation—lightweight, with excellent thermal properties suitable for ceiling light insulation.
Remember, the choice of insulation can dramatically influence the energy efficiency of your space, making the initial selection a pivotal step in your project. By understanding the unique qualities of each material, you can craft an environment that is not only beautifully illuminated but also warmly fortified against the chill of the outside world.
Insulation Installation Process
Embarking on the journey of ceiling light insulation might seem as thrilling as watching paint dry—until you realise it’s the secret sauce to a cozier, more energy-efficient home. The process isn’t rocket science, but it does require a dash of patience and a sprinkle of precision. First, assess your current ceiling setup—no point in adding insulation where it’s already doing a stellar job! Once you’re ready, carefully remove any existing fixtures or obstructions, making room for the new thermal armour.
Next, choose your preferred insulation material, whether it’s the cost-effective fiberglass or the superior spray foam, depending on your needs. For a seamless application, consider using a staple gun or adhesive to secure the insulation in place. If you’re working with irregular spaces or tricky corners, employing a foil-backed radiant barrier can boost the thermal performance dramatically. Remember, proper insulation isn’t just about stuffing the gap; it’s about creating a continuous, airtight seal that keeps warmth in and cold out. With a bit of finesse, your ceiling light insulation will be the unsung hero of your home’s comfort and efficiency.
Post-Installation Checks and Safety Tips
After completing the installation of your ceiling light insulation, it’s essential to perform thorough post-installation checks. Begin by inspecting the entire area to ensure the insulation is evenly distributed and securely fastened. Check that no gaps or compressions exist that could compromise its thermal performance. It’s also vital to verify that all fixtures and electrical components are correctly reconnected and safe to operate.
Safety should always be a priority. Before turning the lights back on, double-check that all wiring is insulated and there are no exposed cables. Make sure the insulation material hasn’t encroached onto any electrical fixtures, which could pose a fire risk. If you notice any irregularities or suspect that the insulation might have shifted, it’s best to re-adjust or seek professional assistance.
- Ensure ventilation pathways remain unobstructed
- Confirm all fixtures are securely fixed and functional
- Test the insulation’s thermal integrity with an infrared thermometer to check for cold spots
Remember, a critical part of ceiling light insulation is maintaining safety protocols throughout the process. Regularly revisiting these checks guarantees your home remains both energy-efficient and secure, maximising the benefits of your insulation efforts.
DIY vs Professional Ceiling Light Insulation
Benefits of DIY Insulation
When it comes to ceiling light insulation, choosing between a DIY approach and hiring a professional can feel like debating whether to bake a cake or order one—both have their perks, but one might leave you with a soggy mess! DIY insulation offers the thrill of hands-on achievement and the potential for significant savings, especially if you’re comfortable with a bit of home improvement. Plus, it gives you the flexibility to tailor the insulation to your specific lighting needs, ensuring optimal energy efficiency and indoor comfort.
On the other hand, professionals boast expertise, specialised tools, and a knack for avoiding common pitfalls, like uneven coverage or gaps that compromise your ceiling light insulation’s effectiveness. But for those willing to roll up their sleeves, the benefits of DIY insulation include a satisfying sense of accomplishment and a lighter wallet—plus, you get to say you did it yourself! Whether you choose to DIY or enlist the pros, proper ceiling light insulation is the key to a warmer, quieter home.
When to Hire a Professional
Deciding whether to undertake your own ceiling light insulation or call in a professional can feel like weighing the comfort of home against the risk of a costly mistake. DIY ceiling light insulation can be immensely rewarding, offering a sense of pride and a significant reduction in costs. For those comfortable with basic home improvement tasks, it becomes a manageable project that can be completed over a weekend. However, proper installation is crucial; uneven coverage or gaps can undermine the insulation’s effectiveness, leading to energy loss and higher bills.
When should you consider hiring a professional? If your ceiling light setup involves complex wiring, limited access, or if you’re unsure about insulation materials, seeking expert help is wise. Skilled installers can ensure your ceiling light insulation is applied evenly and safely, avoiding common pitfalls.
- Complex electrical configurations
- Limited workspace or access
- Concerns about fire safety and insulation regulations
Knowing when to bring in a specialist can save you time, money, and peace of mind, ultimately ensuring your home stays warmer and quieter with properly installed ceiling light insulation.
Cost Comparison and Budget Tips
When it comes to ceiling light insulation, the cost comparison between DIY efforts and hiring a professional can feel like choosing between a bargain bin and a bespoke suit. On the one hand, a DIY approach might only set you back around £50 to £150 for basic materials like fiberglass or foam board insulation—perfect for those who enjoy wielding a staple gun and playing home improvement hero. But beware: uneven coverage or gaps can turn your savings into energy-sapping blunders.
In contrast, professional ceiling light insulation installation typically ranges from £200 to £600, depending on the complexity of the job and the type of insulation used. The upside? Expert installers ensure flawless coverage, optimal safety, and compliance with fire safety regulations. If your ceiling light setup involves limited access or intricate electrical wiring, investing in professional expertise could save you money—and your sanity—in the long run.
Ultimately, balancing your budget against the risks of DIY missteps will determine whether you tackle the project yourself or call in the pros.
Maintenance and Troubleshooting
Periodic Inspection of Insulation
Maintaining optimal performance of your ceiling light insulation requires regular inspection and proactive troubleshooting. Over time, even the most effective insulation can succumb to wear, moisture ingress, or pest intrusion—issues that compromise its insulating properties and safety. Conducting periodic inspections not only prolongs the lifespan of your ceiling light insulation but also ensures energy efficiency remains at its peak. During these inspections, look out for sagging materials, discolouration, or signs of mould, which could indicate moisture problems or insulation degradation.
To streamline troubleshooting, consider creating a checklist that includes key inspection points such as verifying the integrity of the insulation barrier and checking for gaps or compression that could diminish its insulating capacity. For added safety and clarity, an ordered list can be helpful:
- Examine insulation for signs of damage or pest activity.
- Ensure there are no obstructions or compressed sections reducing insulative effectiveness.
- Verify that the ceiling light insulation remains properly installed around fixtures and vents.
- Address any moisture issues immediately to prevent mould growth and further deterioration.
Consistent maintenance and troubleshooting of your ceiling light insulation safeguard your investment, optimise energy savings, and uphold safety standards in your living or working space. Remember, a well-maintained insulation system is a cornerstone of a comfortable, efficient environment!
Signs of Insulation Damage
Over time, even the most resilient ceiling light insulation can reveal signs of wear that threaten both its insulating prowess and safety. Recognising these subtle signals is akin to uncovering hidden runes that safeguard your sanctuary; neglecting them could lead to energy wastage and potential hazards. Common indicators of damage include sagging sections that droop like fallen banners, discolouration that hints at moisture infiltration, and mould growth whispering of unseen dampness lurking within the attic space.
Regular maintenance is essential to ward off these insidious threats. A keen eye can spot pest activity, such as tiny holes or chewed insulation, which compromises the barrier designed to shield your home. Ensuring that no sections of ceiling light insulation are compressed or obstructed helps maintain its thermal integrity. If moisture issues are detected, swift action is vital—promptly addressing leaks or dampness prevents mould proliferation and further deterioration of the insulation materials.
- Examine insulation for signs of pest activity or physical damage.
- Check for compressed or displaced sections that could reduce insulative capacity.
- Inspect around fixtures and vents for proper installation and sealing.
- Immediately resolve any detected moisture problems to prevent mould and material breakdown.
By actively monitoring your ceiling light insulation, you not only extend its lifespan but also bolster your home’s energy efficiency. After all, a well-maintained insulation system is the unseen guardian of comfort and safety—keeping warmth in and cold out, while shielding your space from the silent assault of pests and moisture!
Addressing Common Installation Issues
Addressing common installation issues in ceiling light insulation is crucial to maintaining its optimal performance. Even a minor misstep during installation can ripple through the lifespan of your insulation, reducing energy efficiency and risking safety. When problems arise, troubleshooting becomes an essential skill—uncovering the root causes of inefficiency or damage. Sometimes, the fix involves simple adjustments, like resealing gaps around fixtures or vents.
In more complex scenarios, inspecting the integrity of the insulation installation reveals if sections are compressed, displaced, or poorly secured. These issues diminish the thermal barrier’s ability to regulate temperature effectively. For instance, compressed sections of ceiling light insulation serve as a silent thief of energy, allowing heat to escape in winter and intrude during warmer months. Ensuring proper installation and sealing around fixtures often involves checking for gaps or cracks that could compromise insulation’s seamless shield.
When moisture problems emerge—perhaps from leaks or condensation—swift action is vital. Moisture not only deteriorates the insulation but also fosters mould growth, threatening indoor air quality and safety. Addressing these issues promptly helps sustain the insulation’s insulating prowess and prevents costly repairs down the line.
To streamline repair efforts, consider these steps:
- Examine the ceiling light insulation for signs of damage or pest activity.
- Check for compressed or displaced sections that could reduce insulative capacity.
- Inspect around fixtures and vents to confirm proper installation and sealing.
- Immediately resolve any moisture issues to prevent further deterioration.
By maintaining vigilance and addressing issues swiftly, the longevity and efficacy of your ceiling light insulation are preserved, ensuring your home remains a sanctuary of comfort, energy efficiency, and safety!
Re-insulation Tips
Maintaining the integrity of your ceiling light insulation is akin to nurturing a delicate bonsai—attention to detail ensures it remains resilient and effective. Over time, even the most meticulously installed insulation can suffer from minor mishaps or wear and tear. Regular inspection is your best ally in preventing energy losses and safeguarding safety. When issues crop up, swift troubleshooting can turn potential disasters into manageable hiccups.
Start by examining your ceiling light insulation for signs of damage, such as tears, pest activity, or compression. Compressed sections are insidious—they quietly diminish the thermal barrier, allowing heat to escape in winter or intrude during summer. In cases of moisture infiltration caused by leaks or condensation, immediate action is essential. Moisture not only undermines the insulative properties but also fosters mould growth, a health hazard that no homeowner should tolerate.
Addressing common installation issues during re-insulation is straightforward with a systematic approach:
- Check for gaps or cracks around fixtures and vents, sealing them with appropriate materials.
- Ensure sections of ceiling light insulation are properly secured and not displaced.
- Remove any compressed or damaged insulation and replace it with new, high-quality material.
Occasionally, a simple tweak—like resealing a loose fitting or reapplying a reflective barrier—can restore peak performance. Remember, a vigilant eye and prompt action not only prolong the lifespan of your ceiling light insulation but also uphold your home’s energy efficiency and safety standards. Because in the realm of insulation, a stitch in time truly saves nine—or in this case, a hefty energy bill!
Eco-Friendly and Sustainable Insulation Options
Recyclable and Low-Emission Materials
In a world increasingly conscious of environmental impact, selecting eco-friendly and sustainable insulation options for ceiling light insulation is more vital than ever. Recyclable materials not only reduce landfill waste but also support a circular economy, turning waste into valuable resources. Low-emission materials further minimise indoor air pollution, creating safer, healthier living spaces. These innovative choices often come with impressive thermal qualities, ensuring energy efficiency while protecting the planet.
Opting for insulation made from natural fibres, such as sheep’s wool or cellulose, can dramatically diminish the carbon footprint associated with ceiling light insulation. These materials are biodegradable and often sourced from renewable resources, seamlessly blending sustainability with performance. To make the most of these green options, consider a selection process that includes:
- Recyclability and biodegradability
- Low volatile organic compound (VOC) emissions
- High thermal resistance and durability
By prioritising recyclable and low-emission materials, homeowners and builders contribute to a healthier environment—without sacrificing the efficacy of ceiling light insulation. Embracing these green solutions unlocks a future where comfort and ecological responsibility go hand in hand, transforming ordinary spaces into realms of sustainable innovation.
Benefits of Green Insulation
In a world where sustainability is more than just a trend, embracing eco-friendly and sustainable insulation options for ceiling light insulation can transform spaces into havens of harmony between comfort and conscience. Natural fibres like sheep’s wool and cellulose not only elevate thermal performance but also champion the cause of environmental stewardship. These materials are biodegradable, renewable, and often sourced from sustainable origins, making them the ideal choice for those who refuse to compromise on quality or eco-responsibility.
Choosing green insulation solutions offers a multitude of benefits — from reducing carbon footprints to improving indoor air quality. For example, low-emission materials minimise volatile organic compounds (VOCs), which can otherwise compromise health. Moreover, recyclable materials support a circular economy, turning waste into valuable resources and reducing landfill accumulation. Incorporating such eco-conscious options into your ceiling light insulation ensures your project aligns with the ideals of ecological harmony and energy efficiency.
Incorporating environmentally friendly materials into your ceiling light insulation not only enhances thermal resistance but also fosters a healthier living environment. These innovative solutions often boast impressive durability, standing the test of time while maintaining their ecological integrity. When selecting insulation, consider factors like:
- Recyclability and biodegradability
- Low VOC emissions
- High thermal resistance and resilience
Opting for green insulation materials empowers homeowners and builders alike to forge a future where comfort and ecological responsibility coexist seamlessly. As the world turns towards sustainable innovation, ceiling light insulation made from environmentally friendly materials shines as a beacon of eco-conscious craftsmanship and mindful living.
Making Environmentally Responsible Choices
In a world increasingly conscious of ecological footprints, selecting eco-friendly and sustainable options for ceiling light insulation becomes more than just a choice—it’s a statement of values. Environmentally responsible materials such as sheep’s wool and cellulose not only provide superior thermal resistance but also champion the cause of green living. These natural fibres are biodegradable, renewable, and sourced from sustainable origins, making them an ideal solution for those who refuse to compromise on quality or environmental integrity.
Opting for green insulation materials transforms your space into a sanctuary of harmony between comfort and conscience. Not only do they reduce carbon footprints, but they also contribute to healthier indoor air quality by emitting low levels of volatile organic compounds (VOCs). For example, recycled paper-based cellulose insulation and sheep’s wool naturally regulate humidity and prevent mould growth. Incorporating these materials into your ceiling light insulation aligns your project with the principles of ecological stewardship and energy efficiency.
Furthermore, environmentally friendly ceiling light insulation options often boast remarkable durability, standing the test of time without sacrificing ecological integrity. When selecting eco-conscious insulation, consider aspects such as recyclable and biodegradable properties, low VOC emissions, and high thermal resistance. These criteria ensure that your choice supports a circular economy and fosters sustainable living—turning waste into resource and reducing landfill burden. Such mindful decisions illuminate a path towards a future where comfort and environmental responsibility coexist seamlessly.
FAQs About Ceiling Light Insulation
How Effective Is Ceiling Insulation for Lighting Areas?
Ceiling light insulation plays a crucial role in enhancing the efficiency of your lighting areas—yet many homeowners question just how effective it truly is. When properly installed, ceiling light insulation can significantly reduce heat loss, ensuring your lighting spaces remain warm in winter and cool in summer. This not only improves comfort but also optimises energy consumption, leading to lower utility bills. The level of insulation’s effectiveness largely depends on the material chosen and the quality of installation, but generally, it creates a formidable barrier against thermal transfer.
Interestingly, certain types of ceiling light insulation, such as spray foam or reflective barriers, can offer superior performance by sealing gaps and reflecting radiant heat. For maximum impact, consider a comprehensive assessment of your existing setup, as even small improvements can have a noticeable effect on your lighting environment. When installed correctly, ceiling light insulation becomes a silent guardian, quietly maintaining the ideal climate while your lighting fixtures shine brightly without excess energy drain.
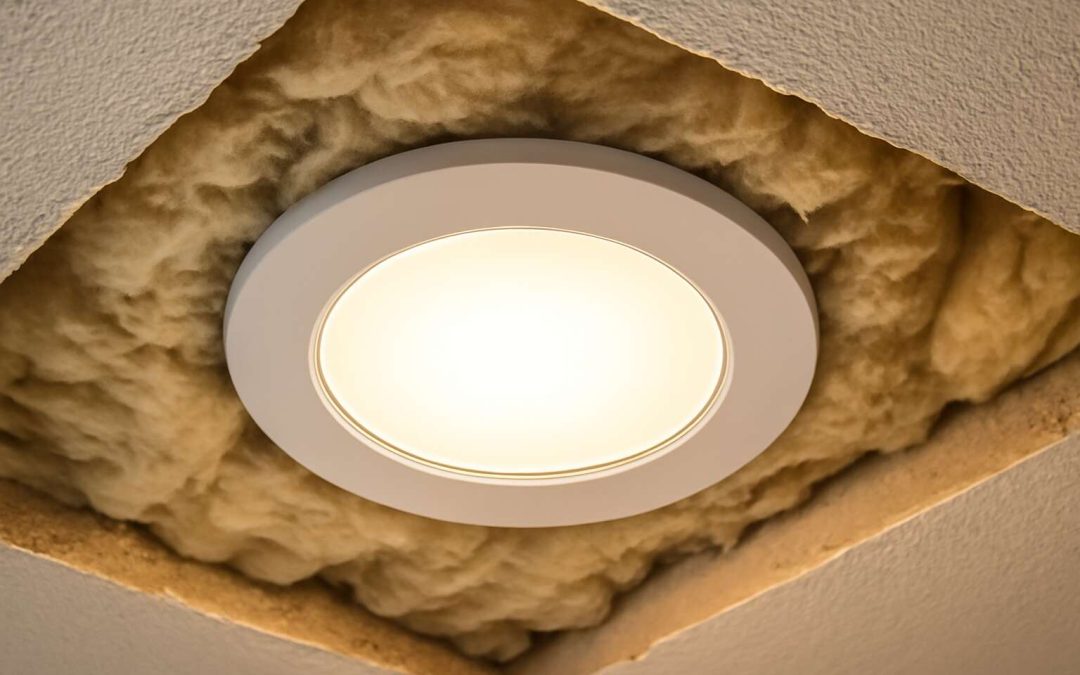
Can I Insulate Around Existing Light Fixtures?
Many homeowners wonder if they can insulate around existing light fixtures without compromising safety or functionality. The answer is yes, but with caution and precision. Properly insulating around ceiling light fixtures requires a careful approach to avoid fire hazards or electrical issues. It’s essential to select insulation materials that are compatible with lighting environments—materials that are non-combustible and installed with adequate clearance.
When insulating around ceiling light insulation, consider the type of fixture—recessed, surface-mounted, or pendant—as each presents unique challenges. For example, LED fixtures tend to generate less heat, making them more forgiving for insulation purposes. For traditional bulbs, especially halogen or incandescent, extra care is needed to prevent overheating. Consulting manufacturer guidelines or a professional installer can help ensure that your insulation work remains safe and effective.
In some cases, creating a sealed, insulated barrier with reflective or radiant barriers can enhance energy efficiency without encroaching on the fixture’s heat dissipation. Remember, safety must always be the top priority—never compromise on clearance or fire resistance. With thoughtful planning, ceiling light insulation can be integrated seamlessly, maintaining both the beauty of your lighting and the comfort of your space.
What Are the Safety Considerations?
Ensuring safety when undertaking ceiling light insulation is paramount; neglecting this aspect can lead to perilous consequences. The interplay between insulation materials and light fixtures demands meticulous attention, especially considering the heat generation of traditional bulbs versus energy-efficient LEDs. For ceiling light insulation to be both effective and safe, it must account for the fixture type and the manufacturer’s specifications. Overlooking clearance distances or using incompatible materials can inadvertently create fire hazards or electrical malfunctions.
When insulating around existing light fixtures, it’s wise to consider creating a barrier that maximises energy efficiency without compromising safety. An effective method involves installing reflective or radiant barriers that help reduce heat transfer while maintaining necessary ventilation. Here’s a quick overview of safety considerations:
- Always verify the fixture’s heat tolerance and follow the manufacturer’s guidelines.
- Maintain adequate clearance around incandescent, halogen, or traditional bulbs to prevent overheating.
- Utilise non-combustible insulation materials, such as mineral wool or specialised fire-resistant batts, to mitigate fire risk.
In some cases, a professional consultation becomes invaluable, especially when working with complex ceiling light insulation setups or older wiring. Remember, safety is not merely a precaution but the foundation upon which effective insulation should be built — ensuring your home remains warm, energy-efficient, and secure. With careful planning, the integration of ceiling light insulation can be seamlessly achieved, safeguarding both your family and your investment in your property’s comfort and safety.
How Long Does Insulation Last?
Ceiling light insulation isn’t a one-and-done project; it’s an investment in your home’s comfort and safety that can last for years. Typically, well-installed insulation materials like mineral wool or foam board have a lifespan of around 20 to 30 years. However, the longevity depends on factors such as environmental conditions, quality of materials used, and whether the insulation remains undisturbed. Over time, insulation can settle or degrade, reducing its effectiveness and potentially compromising safety around ceiling light fixtures.
Regular inspections are essential to ensure your ceiling light insulation continues to perform optimally. Look out for signs like discolouration, compacted materials, or gaps that may indicate the need for re-insulation. Addressing these issues early not only maintains energy efficiency but also prevents fire hazards, especially if insulation has been compromised near lighting fixtures. Remember, maintaining the integrity of ceiling light insulation is vital for preserving a safe and cosy home environment.