Understanding Ceiling Insulation
What is Ceiling Insulation?
Ceiling insulation is the unsung hero of home comfort. It acts as a barrier, trapping warm air in winter and keeping it out during summer. Without proper ceiling insulation, energy bills can skyrocket, and indoor temperatures become unpredictable. It’s a critical component of effective ceiling insulation installation, ensuring your home stays cosy year-round.
Understanding what ceiling insulation is can seem simple, but its impact is profound. It’s typically made from materials like mineral wool, foam, or fibreboard, each chosen for their thermal properties and ease of installation. When installed correctly, ceiling insulation forms a seamless layer that minimises heat transfer through the roof space.
In fact, the efficiency of your ceiling insulation depends heavily on the quality of installation. Proper ceiling insulation installation involves meticulous placement to avoid gaps, compression, or voids, which can undermine its insulating properties. For optimal results, it’s essential to select the right materials and employ expert techniques for seamless coverage.
Types of Ceiling Insulation Materials
When it comes to choosing the right materials for ceiling insulation, the options are as diverse as the personalities in a well-mannered dinner party. Each material boasts unique thermal properties, making them suitable for different homes and budgets. The most common choices include mineral wool, foam, and fibreboard—each offering a different flavour of insulation prowess.
Mineral wool, for instance, is celebrated for its fire resistance and soundproofing qualities, making it a favourite among those who value safety and serenity. Foam insulation, often in the form of spray or rigid boards, provides an airtight seal that can be particularly beneficial in older homes where gaps tend to appear like unwelcome guests. Fibreboard, on the other hand, is appreciated for its ease of installation and eco-friendly credentials.
To ensure optimal performance, many professionals follow a straightforward but meticulous process during ceiling insulation installation. This includes careful selection, precise placement, and the avoidance of compression or voids—because even the slightest oversight can turn your cosy sanctuary into a thermal sieve. After all, the devil is in the details, and in this case, so is the comfort.
Benefits of Proper Ceiling Insulation
Proper ceiling insulation isn’t just about keeping the cold out or the warmth in — it’s a masterclass in creating a cosy, energy-efficient sanctuary. When expertly installed, ceiling insulation can slash your energy bills, reduce carbon footprint, and even make your home more peaceful by dampening unwanted noise. It’s like giving your living space a warm, insulating hug that lasts all year round.
Think of the benefits as a trifecta: enhanced thermal performance, lowered heating and cooling costs, and increased comfort. A well-executed ceiling insulation installation ensures there are no sneaky gaps or compressed spots that can turn your thermal fortress into a draughty nightmare. With the right approach, your home becomes less dependent on heaters and air conditioners, saving money and the environment simultaneously.
In fact, experts often emphasise that the true magic of ceiling insulation lies in its consistency. A seamless, airtight installation not only maximises energy efficiency but also preserves the structural integrity of your ceiling. For those who appreciate the finer things in life—like a warm cup of tea on a chilly day—proper ceiling insulation is an investment that keeps on giving, insulating not just your home but your peace of mind as well.
Factors to Consider Before Installing Ceiling Insulation
Assessing Your Home’s Insulation Needs
Before embarking on ceiling insulation installation, it’s vital to evaluate your home’s unique needs—no two properties are alike, and overlooking this step can undermine the entire effort. An insightful assessment reveals gaps in insulation, thermal bridging issues, or areas of air leakage that might otherwise be invisible but significantly impact energy efficiency.
Understanding the specific requirements of your home guides a tailored approach, ensuring that the chosen insulation material and method effectively address your thermal comfort and cost-saving goals. Consider factors such as roof orientation, existing insulation levels, and the presence of electrical wiring or fixtures—these elements influence the complexity and scope of ceiling insulation installation.
To streamline your planning, creating a checklist can be invaluable. For example, you might evaluate:
- The current state of your ceiling’s insulation
- The potential for moisture issues or mould growth
- Accessibility for installation work
Addressing these considerations early on ensures a seamless process, maximising the benefits of your investment in ceiling insulation installation while contributing to a more sustainable, energy-efficient home environment.
Calculating R-Value for Effective Insulation
When contemplating ceiling insulation installation, understanding the significance of calculating the R-Value cannot be overstated. This measure of thermal resistance acts as a pivotal benchmark, guiding homeowners toward insulation that genuinely enhances energy efficiency. An R-Value that’s too low risks leaving your home vulnerable to heat loss, while an excessively high rating may lead to unnecessary expense and installation challenges. Striking the right balance demands a nuanced appreciation of your home’s unique thermal dynamics.
Factors such as climate zone, roof pitch, and existing insulation levels influence the optimal R-Value for your ceiling. It’s advisable to consider the following:
- The typical temperature fluctuations in your region
- Potential moisture accumulation that could compromise insulation integrity
- The ease of access to your ceiling space for installation purposes
This tailored approach ensures that your ceiling insulation installation not only insulates but also fortifies your home against the relentless march of weather’s whims, turning your living space into a bastion of comfort and efficiency.
Choosing the Right Insulation Material for Your Ceiling
Choosing the right insulation material for your ceiling is more than a matter of preference; it’s an act of aligning your home’s needs with the relentless forces of nature. The complexity lies in the subtle interplay of thermal resistance, moisture control, and ease of installation. When considering ceiling insulation installation, it’s crucial to evaluate factors like climate zone—where colder regions demand higher R-Values—and the roof pitch, which influences heat flow and insulation effectiveness.
Moisture accumulation, often overlooked, can compromise the integrity of your chosen material, leading to mould or deterioration over time. Additionally, accessibility to your ceiling space plays a pivotal role—difficult-to-reach areas might necessitate more flexible or lightweight insulation options. Remember, the optimal choice isn’t merely about the best thermal performance but about how well it integrates into your home’s unique environmental and structural context.
Budget Considerations
Budget considerations are often the deciding factor in any home improvement project, and ceiling insulation installation is no different. While investing in quality insulation can lead to long-term energy savings, it’s essential to weigh upfront costs against potential benefits. Unexpected expenses can arise, especially if your ceiling space requires significant structural modifications or specialised access solutions.
Understanding the scope of your project helps prevent surprises. For instance, if your home has a complicated or hard-to-access ceiling space, the cost of installation may increase due to the need for specialised tools or labour. To navigate this, consider creating a detailed budget that accounts for insulation material, labour, and any additional costs such as ventilation adjustments or moisture barriers.
Remember, a well-planned budget for ceiling insulation installation ensures that you don’t compromise on quality or performance—ultimately enhancing your home’s comfort and energy efficiency. For many homeowners, balancing cost with the long-term gains of proper insulation is the key to making an informed decision that pays dividends over time.
Building Regulations and Standards
Before embarking on any ceiling insulation installation project, it’s vital to scrutinise the building regulations and standards that govern such work. In the UK, compliance isn’t merely a bureaucratic checkbox; it’s a safeguard that ensures your home remains safe, efficient, and legally sound. Non-compliance can lead to costly modifications down the line, or even legal repercussions.
Building codes specify minimum insulation levels, fire safety requirements, and ventilation standards that must be met. These regulations are designed to optimise energy efficiency while maintaining safety. During the planning phase, consult local authority guidelines and ensure your chosen insulation materials and installation methods align with current standards. This proactive approach not only streamlines your project but also guarantees that your ceiling insulation installation adheres to all legal and safety parameters.
Step-by-Step Guide to Installing Ceiling Insulation
Preparing Your Space for Installation
Ceiling insulation installation can significantly reduce energy bills—sometimes by up to 30%. Before diving into the process, it’s essential to prepare your space thoroughly. A well-prepared environment ensures safety, efficiency, and a cleaner finish. Start by clearing the area beneath the ceiling, removing any furniture or obstacles that could hinder access. Next, inspect the ceiling for any damage or leaks, as these issues should be addressed before insulation goes in. Proper preparation not only makes the installation smoother but also maximises the insulation’s effectiveness and longevity.
Once the space is ready, it’s helpful to create a checklist to guide your steps. Here’s a quick overview:
- Ensure proper ventilation and lighting for safe working conditions
- Wear protective gear such as gloves, masks, and goggles
- Gather all necessary materials and tools in advance
- Check the ceiling’s structural integrity to support insulation weight
Taking these initial steps sets a solid foundation for a successful ceiling insulation installation, leading to improved thermal performance and energy efficiency in your home or commercial space.
Safety Precautions and Equipment Needed
Embarking on a ceiling insulation installation adventure? Before you get your hands dirty, safety isn’t just a buzzword—it’s the foundation of a successful project. Protecting yourself with the right equipment can turn a potentially messy job into a smooth operation. Think beyond just gloves—goggles, masks, and even coveralls are your best friends when handling fibre insulations or spray foam. After all, inhaling loose fibres or airborne debris is a risk best avoided, and a little protective gear goes a long way in preventing irritation.
Now, for the essential tools—don’t leave this to chance. A sturdy ladder or scaffolding, a utility knife, insulation blowers (if you’re going the loose-fill route), and a tape measure are non-negotiables. Safety glasses and dust masks are crucial to shield your eyes and lungs, especially during the more vigorous parts of ceiling insulation installation. Remember, a well-prepared workspace, with proper ventilation and lighting, not only keeps accidents at bay but also makes the entire process more efficient.
- Ensure all protective gear is in place before starting.
- Check that your tools are in good condition; dull blades and broken equipment are no friends of safety.
- Confirm that the working environment has adequate ventilation to disperse any airborne fibres or fumes.
By prioritising safety precautions and assembling your equipment with care, you’ll lay the groundwork for a seamless ceiling insulation installation. Because, let’s face it, a job done right the first time saves not just money, but also a considerable amount of stress—and who doesn’t want that?
Removing Old Insulation and Debris
Before the cosy warmth of ceiling insulation installation can truly take hold, the old layers of insulation and debris need to be carefully removed. This step is often overlooked, but it’s essential for ensuring the new insulation performs at its best. Clearing out existing material not only improves energy efficiency but also creates a clean slate for the new installation to settle properly. During this process, take your time—rushing can lead to missed debris or damage to your ceiling structure.
Start by donning your protective gear, then carefully remove the old insulation, whether it’s fibre batts or loose-fill. Use a sturdy utility knife to cut away any damaged sections, and gather all debris into sturdy bags or containers for disposal. It’s a labour of love that demands patience—removing old insulation isn’t glamorous, but it’s the foundation of a successful ceiling insulation installation. Once the area is clear, inspect for any signs of structural issues or mould, addressing these before proceeding further. This thorough preparation ensures your new insulation will sit snugly, providing the warmth and energy savings you’ve been dreaming of.
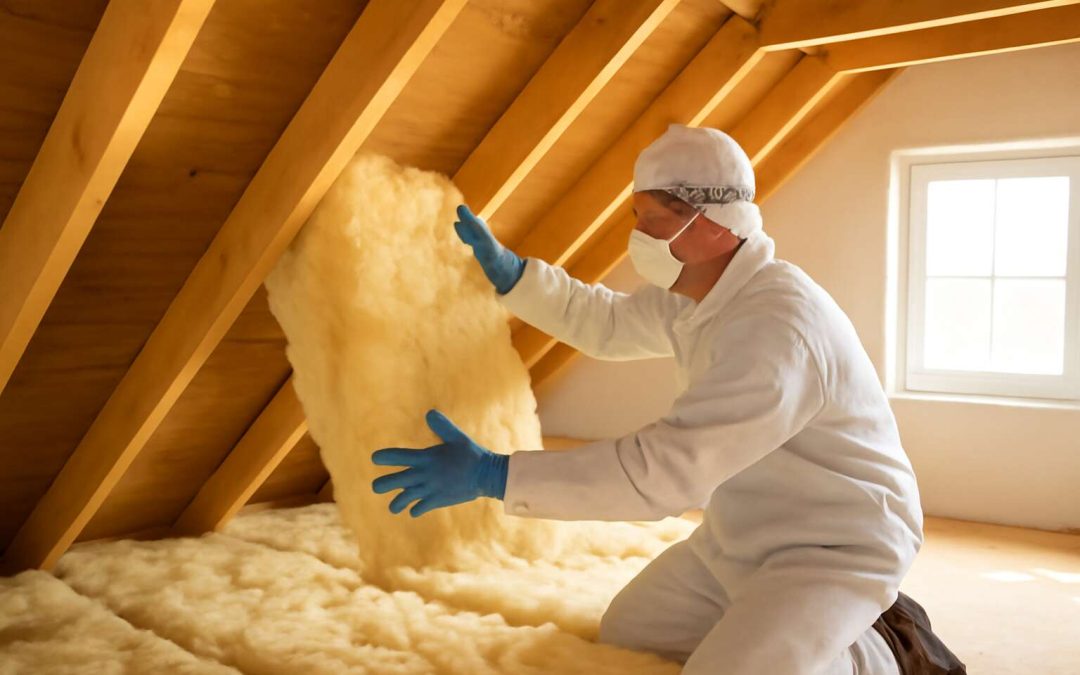
Installing New Insulation Material
Once the old, ghostly remnants of insulation have been banished, the true artistry of ceiling insulation installation begins. This phase demands patience and precision, for it is in these moments that the new layer of warmth is forged. Carefully unroll or pour the chosen insulation material—be it fibre batts, loose-fill, or spray foam—ensuring it fills every crevice and corner. The goal is to create a seamless barrier against the biting cold and relentless heat, transforming your attic into a sanctuary of comfort.
To achieve a flawless finish, consider following this sequence:
- Start by measuring the ceiling space meticulously, so your insulation fits snugly without gaps or overlaps.
- Lay the insulation material evenly across the surface, using a broad tool or specialised equipment to avoid compression, which can diminish its effectiveness.
- Pay close attention to areas around joists, vents, and other fixtures, ensuring these are insulated thoroughly to prevent thermal bridging.
During the installation of ceiling insulation, it’s paramount to maintain safety standards—wear protective gear, work in well-ventilated spaces, and avoid compression of the material. When completed, the ceiling should look untouched, yet beneath the surface, a fortress of thermal resistance now stands ready to guard your home from the elements. This meticulous process, though seemingly mundane, is the crux of successful ceiling insulation installation—an invisible shield that promises enduring warmth and energy efficiency.
Ensuring Proper Coverage and Avoiding Gaps
Achieving perfect coverage during ceiling insulation installation is like nailing a delicate ballet—precision, patience, and a keen eye for gaps. A snug fit ensures your home stays warm in winter and cool in summer, without those pesky drafts sneaking through. To do this effectively, measure your ceiling space meticulously—no one wants insulation spilling over or leaving awkward voids.
Once you’re armed with measurements, spread the insulation material evenly across the surface. Whether you’re laying fibre batts, pouring loose-fill, or spraying foam, avoid compression at all costs. Compressed insulation loses its insulating prowess faster than your favourite jumper shrinks in the wash. Pay special attention to tricky corners, around joists, and near vents, as these are common culprits for thermal bridging.
To streamline your ceiling insulation installation, consider using a simple
- measuring tape
- broad knife
- insulation supports
. These tools help ensure the material fills every nook and cranny, creating an unbroken barrier against the elements. Remember, the goal is seamless coverage—no gaps, no overlaps—so your home enjoys maximum energy efficiency and comfort.
Sealing and Finishing Touches
Sealing and finishing your ceiling insulation is the final step that makes all the difference. A tight seal prevents drafts and maximises energy efficiency. Start by inspecting the edges and gaps, filling them with suitable sealant or expanding foam. This step ensures your insulation barrier remains airtight, maintaining consistent indoor temperatures.
Once sealed, carefully trim any excess insulation to create a clean, level surface. Use a sharp knife or insulation supports to secure the material firmly in place. Proper finishing touches, such as fitting protective covers around vents and light fixtures, not only improve appearance but also safeguard the insulation from damage over time.
For a streamlined process, consider following this simple sequence:
- Seal all gaps and joints with appropriate sealant.
- Trim excess insulation for a neat finish.
- Install protective covers around fixtures.
- Ensure the insulation is flush and secure across the entire ceiling surface.
This method guarantees your ceiling insulation installation achieves a seamless, insulated barrier. When completed with precision, it boosts your home’s energy efficiency and comfort for years to come. Remember, the finishing touches are what transform a basic installation into a professional-grade result!
DIY vs Professional Ceiling Insulation Installation
Advantages of DIY Installation
Opting for DIY ceiling insulation installation might sound tempting—after all, who doesn’t love the thrill of rolling up their sleeves and wielding a trusty staple gun? The biggest perk? Cost savings. Skip the labour charges and you can channel that budget into higher-quality materials or even a celebratory cup of tea. Plus, there’s a certain satisfaction in knowing you’ve taken matters into your own hands, transforming your attic from a chilly cavern into a warm sanctuary.
However, it’s not all sunshine and insulation batts. While DIY installation can be rewarding, it requires patience, skill, and a keen eye for detail. Proper coverage is crucial—miss a spot, and you risk losing the very thermal efficiency you’re after. Here’s a quick rundown of the advantages:
- Lower upfront costs
- Flexibility to work on your own schedule
- Immediate hands-on control over the quality of the installation
Of course, for those lacking confidence or experience, hiring a professional for ceiling insulation installation ensures the job is done right the first time, avoiding costly mistakes and health hazards. But if you’re up for the challenge, the DIY route can be both a money-saver and a satisfying project that boosts your home’s energy efficiency. After all, there’s nothing quite like the pride of having insulated your own ceiling—fighting off drafts and saving money, one batt at a time!
Challenges and Risks of DIY Projects
While the prospect of a DIY ceiling insulation installation can be appealing—offering savings and a sense of accomplishment—it also presents notable challenges and risks. Without proper expertise, even a small oversight can compromise the entire project’s effectiveness, leading to heat loss and increased energy bills. Mistakes like uneven coverage or gaps in insulation are common pitfalls that diminish thermal performance and negate the effort invested.
Inexperienced installers may also underestimate the importance of safety procedures, risking exposure to fibres or improper handling of materials. For example, working in confined attic spaces without adequate ventilation or protective gear can pose health hazards. Additionally, incorrect sealing or neglecting to secure insulation properly can cause drafts and moisture issues, which may damage your home over time.
To illustrate, here’s an overview of common pitfalls in DIY ceiling insulation installation:
- Overlooking necessary safety precautions, risking health hazards
- Failing to achieve comprehensive coverage, leading to thermal bridging
- Misplacing insulation, causing gaps and inefficiencies
- Improper sealing that allows drafts and moisture ingress
Given these complexities, many homeowners find that enlisting a professional ensures the job is completed to high standards, avoiding costly errors and future renovations. Ceiling insulation installation is a task that demands both patience and precision—qualities best handled by trained specialists who understand the nuances of effective thermal management. After all, a well-insulated ceiling isn’t just about comfort; it’s about safeguarding your home’s future against the wear and tear of time.
When to Hire a Professional Insulation Installer
Ceiling insulation installation can seem straightforward, but the truth is, it’s a task that demands precision and expertise. While DIY enthusiasts might be tempted by the promise of savings and a sense of achievement, the risks often outweigh the benefits. Professional insulation installers bring experience, specialised tools, and an understanding of building regulations that DIY projects lack.
When the stakes are high—think safety hazards, uneven coverage, or moisture issues—it’s wise to consider enlisting a professional. They can assess your home’s unique needs and ensure the insulation installation is both effective and compliant. In fact, many homeowners find that trusting a seasoned installer prevents costly mistakes and ensures long-term performance.
Ultimately, the decision hinges on your confidence and expertise. If in doubt, hiring a professional ceiling insulation installer is a prudent choice to safeguard your home’s energy efficiency and structural integrity.
How to Choose a Reputable Insulation Contractor
Deciding between DIY and professional ceiling insulation installation is a choice that often hinges on one’s confidence and the complexity of the project. While the allure of saving a few pounds and feeling accomplished may tempt the brave-hearted, the truth is that ceiling insulation installation demands a finesse that most amateurs lack. Improper coverage, gaps, or mishandling can severely compromise the thermal performance of your home—and nobody wants a chilly surprise in winter!
For those leaning towards a DIY approach, it’s vital to understand the potential pitfalls. An untrained hand might overlook crucial steps or fail to adhere to building standards, leading to costly remedial work down the line. Conversely, a seasoned professional brings not only specialised tools but also an intuitive grasp of insulation intricacies. When selecting a reputable insulation contractor, consider their experience, reputation, and adherence to safety and quality standards. An expert will ensure that your ceiling insulation installation is flawless, long-lasting, and compliant—saving you money and headaches in the long run.
Cost and Time Estimates for Ceiling Insulation Installation
Factors Influencing Cost
The shadowy realm of ceiling insulation installation often cloaks itself in mystery, yet understanding the cost and time estimates can illuminate the path forward. In the dim corridors of budgeting, factors such as the size of the space, choice of insulation material, and complexity of access weave a tangled web that influences the final price. A modest attic might be swift and economical, while a sprawling, intricate ceiling demands more time and resources.
Time estimates fluctuate just as dramatically. Simple installations can be completed within a day, yet complex projects with bespoke requirements may stretch into multiple days. To demystify the process, consider these key influences:
- Size and shape of the ceiling
- Type and R-value of insulation selected
- Accessibility and height of the ceiling space
- The necessity of removing old insulation or debris
- Additional sealing or finishing work needed
Understanding these variables allows for a clearer view of the investment required, transforming the enigmatic into the manageable in the shadowed art of ceiling insulation installation.
Average Cost Breakdown
Embarking on a ceiling insulation installation project is akin to stepping into a world of transformation—where comfort and efficiency are within reach. The average cost for ceiling insulation installation varies widely, typically ranging from £300 to £1,200 depending on several pivotal factors. A simple attic, with straightforward access, might lean toward the lower end of the spectrum, while sprawling, complex ceilings with challenging access points can push costs higher. The choice of insulation material, whether mineral wool or spray foam, also plays a significant role in the overall expenditure.
Time estimates mirror this variety. A standard job in a small space could be completed within a single day, making it a swift and cost-effective upgrade. However, intricate projects requiring removal of old insulation or specialised sealing might extend over multiple days. It’s essential to consider these variables, as they weave a tapestry of influences that shape both the timeline and budget for your ceiling insulation installation.
Estimated Timeframe for Completion
The timeframe for ceiling insulation installation can be surprisingly swift or delightfully drawn out, depending on the scope and complexity of the project. For a modest attic with uncomplicated access, a professional team might complete the work within a single day, transforming your home with minimal disruption. However, more intricate projects—such as those involving removal of outdated insulation or dealing with challenging access points—could extend over several days. The key lies in understanding that each home presents its unique tapestry of needs, influencing both cost and duration.
In some scenarios, a carefully orchestrated sequence of steps ensures a seamless process. For instance, initial assessment, removal of old insulation, and the precise installation of new materials might follow a structured order, allowing for efficiency and safety. When planning for ceiling insulation installation, it’s wise to anticipate potential delays caused by unforeseen obstacles or specialised sealing requirements. Ultimately, accurate time estimates reflect the intricacies of your specific space and the expertise of the contractor involved.
Maintaining Your Ceiling Insulation
Regular Inspections and Checks
Regular inspections of your ceiling insulation are vital to maintaining its efficiency and ensuring your home remains warm in winter and cool in summer. Over time, factors like moisture, pests, or settling can compromise the integrity of your ceiling insulation. By conducting routine checks, you can identify potential issues before they escalate into costly repairs or energy wastage.
During these inspections, look out for signs of sagging, mould growth, or gaps that could reduce insulation effectiveness. A thorough check might include removing small sections of ceiling or using a flashlight to peer into hard-to-see areas. Remember, even minor damage can significantly impact the performance of your ceiling insulation installation.
An effective way to keep your insulation in top condition is to create a simple checklist:
- Inspect for moisture or water damage
- Check for pest entry points
- Look for compression or sagging of insulation material
- Ensure no gaps or holes are present
- Verify proper coverage across the entire ceiling space
Staying proactive with these regular checks helps prolong the lifespan of your ceiling insulation and ensures your investment continues to pay dividends in energy efficiency.
Signs of Insulation Issues
Ceiling insulation installation is a vital component of maintaining an energy-efficient home, but even the most expertly installed insulation can deteriorate over time. Recognising the signs of insulation issues early can prevent unnecessary expenditure and preserve your comfort. Often, homeowners notice sagging or uneven patches in their ceiling insulation, which indicate compression or settling that reduces its insulating properties. Persistent mould or damp patches can also signal moisture ingress, compromising both health and insulation efficiency.
Furthermore, gaps or holes in the insulation layer create thermal bridges, allowing heat to escape during winter or enter during summer. Regular visual inspections—using a flashlight to peek into hard-to-reach areas or removing small sections of ceiling—can reveal these hidden flaws. Maintaining a keen eye for these signs ensures your ceiling insulation remains effective, prolonging its lifespan and safeguarding your investment in energy efficiency.
- Inspect for moisture or water damage
- Check for pest entry points that could disturb the insulation
- Look for compression, sagging, or displacement of insulation material
- Ensure there are no gaps or holes compromising coverage
- Verify consistent insulation coverage across the entire ceiling space
Proactive detection of insulation issues not only enhances the longevity of your ceiling insulation but also sustains the optimal thermal performance your home deserves. A vigilant approach is the cornerstone of a comfortable, energy-efficient living environment—an essential aspect of responsible homeownership in today’s climate-conscious world.
When to Upgrade or Reinstall Insulation
In the quiet sanctuary of your home, the integrity of ceiling insulation installation acts as an unseen guardian, silently shaping your comfort and energy bills. Yet, over time, even the most meticulous installation can falter—settling, sagging, or succumbing to the relentless march of moisture and pests. Recognising when your insulation has outlived its prime is a vital step in preserving its thermal efficacy and safeguarding your sanctuary from unwelcome drafts and rising costs.
Regular inspections are the key to an enduring shield. Look for telltale signs such as compressed patches, sagging material, or unwelcome dampness—each a whisper of trouble brewing beneath the surface. Gaps or holes in the insulation layer act as thermal bridges, allowing precious heat to escape in winter or infiltrate during summer, undermining your home’s energy efficiency. When these signs appear, it may be time to consider a comprehensive upgrade or reinstallation of your ceiling insulation.
- Detecting moisture ingress or water damage that weakens insulation integrity
- Identifying pest entry points that disturb or decompose insulation material
- Assessing for compression, sagging, or displacement of the insulation layer
- Ensuring coverage remains uniform across the entire ceiling space, with no gaps or holes
When the signs of wear become undeniable, a reinstallation of ceiling insulation is not merely an upgrade but a renewal—restoring the home’s thermal armour to its former glory and reinforcing energy conservation efforts. In this dance of renewal, understanding the precise moment to act ensures your home remains a haven of warmth and efficiency, even as the seasons shift and time takes its toll.
Additional Tips for Maximizing Insulation Efficiency
Improving Air Sealing
Maximising the efficiency of your ceiling insulation installation isn’t just about choosing the right materials; it’s also about fostering an environment where air flows seamlessly, reducing heat loss and energy bills. A well-sealed ceiling prevents warm air from escaping and chilly drafts from sneaking in, ensuring your home remains cosy all year round. One often overlooked step is improving air sealing around junctions, vents, and light fittings—a process that can dramatically enhance insulation performance.
To truly optimise your ceiling insulation installation, consider these additional tips:
- Seal gaps with high-quality, breathable sealant or weatherstripping to prevent air leaks.
- Install baffles or vent chutes to facilitate proper airflow and prevent insulation from blocking ventilation pathways.
- Use foam tape around fixtures and pipe penetrations to create a tight seal.
Taking these measures not only boosts insulation effectiveness but also extends its lifespan, saving you money and improving your home’s comfort. Remember, the goal isn’t just to add insulation but to integrate it with precise air sealing—transforming your living space into a sanctuary of warmth and efficiency.
Ventilation Tips
Maximising the effectiveness of your ceiling insulation installation demands more than just stacking up materials; it requires meticulous attention to ventilation. Poorly managed airflow can compromise insulation performance, leading to heat loss and increased energy bills. Proper ventilation allows moist air to escape and prevents condensation, which can damage your insulation over time.
One effective way to enhance ventilation is through the use of baffles or vent chutes. These devices create a clear pathway for air to flow freely between the roof space and the exterior, preventing insulation from blocking vital ventilation routes. Additionally, sealing gaps around junctions, vents, and light fittings with foam tape or weatherstripping is crucial. These small details make a big difference in maintaining a sealed environment that optimises your ceiling insulation installation.
- Install breathable sealants around fixtures to prevent drafts.
- Use vent chutes or baffles to ensure proper airflow pathways.
- Regularly inspect and maintain vents and seals to keep ventilation channels clear.
Incorporating these ventilation tips not only boosts the performance of your ceiling insulation but also prolongs its lifespan. Remember, the key to a truly energy-efficient home lies in balancing insulation with effective airflow—transforming your space into a sanctuary of warmth and comfort.
Complementary Home Insulation Strategies
Maximising the efficiency of your ceiling insulation installation isn’t solely about selecting the right materials; it also hinges on integrating complementary home insulation strategies. A holistic approach ensures your home remains warm in winter and cool in summer, while also reducing energy bills. One often overlooked aspect is the synergy between insulation and ventilation. Proper airflow allows moisture to escape, preventing mould and deterioration, ultimately prolonging the lifespan of your insulation.
To create an optimal environment, consider implementing a combination of techniques such as:
- Installing breathable sealants around fixtures and junctions to prevent drafts.
- Using vent chutes or baffles to facilitate continuous, unobstructed airflow between the roof space and the outside environment.
- Incorporating high-quality vent covers that prevent debris accumulation while allowing air to circulate freely.
By integrating these strategies, you not only enhance the performance of your ceiling insulation installation but also foster a healthier, more energy-efficient home environment. Remember, the true art of insulation lies in balancing thermal barriers with effective airflow—an essential harmony for sustainable living.