Understanding Garage Ceiling Insulation
What is Ceiling Insulation?
Imagine stepping into your garage, a space often overlooked yet crucial in maintaining your home’s overall energy efficiency. Ceiling insulation garage is the unsung hero in this scenario, quietly working behind the scenes to regulate temperature and reduce energy bills. Without proper insulation, your garage can become a thermal battleground—either an icebox in winter or a furnace in summer.
Ceiling insulation, in essence, is the layer of material installed between the ceiling joists to trap heat, block drafts, and create a more comfortable environment. Whether you’re using your garage as a workshop, storage, or even a secondary living space, understanding the significance of ceiling insulation garage is paramount. It’s about more than just comfort; it’s a strategic move to optimise energy consumption and protect your property from moisture and mould.
Incorporating the right type of ceiling insulation can be straightforward, but it requires a keen eye for detail. Consider options like mineral wool, foam boards, or blown-in cellulose—each with its unique merits. For a seamless fit, you might find it helpful to think of the process as an elegant dance, where proper preparation and precise execution lead to a harmonious result.
Importance of Insulating Your Garage Ceiling
Proper ceiling insulation garage isn’t just about comfort; it’s about safeguarding your property’s energy efficiency. An uninsulated garage can double your heating and cooling costs—an unnecessary expense in today’s energy-conscious world. Insulating your garage ceiling creates a thermal barrier, preventing heat from escaping in winter or creeping in during summer. This simple upgrade can make a significant difference in maintaining a stable indoor climate.
Moreover, ceiling insulation garage helps prevent moisture build-up and mould growth, which can compromise structural integrity over time. By choosing the right insulation—be it mineral wool, foam boards, or blown-in cellulose—you’re investing in a healthier, more energy-efficient space. Remember, the better your garage is insulated, the less strain on your main heating and cooling systems, leading to lower bills and a more comfortable environment year-round.
Common Materials Used for Garage Ceiling Insulation
Understanding the myriad materials used for ceiling insulation garage reveals a tapestry of options, each with its own unique charm and purpose. The choice of material can transform a mundane space into a sanctuary of thermal harmony. Among the most common are mineral wool, foam boards, and blown-in cellulose — each serving as a vital guardian against the capricious elements outside.
Mineral wool, celebrated for its fire resistance and soundproofing qualities, offers a dense barrier that traps warmth with an almost magical resilience. Foam boards, lightweight yet formidable, glide seamlessly into tight spaces, providing an insulative fortress that resists moisture and air leaks. Blown-in cellulose, a sustainable marvel, envelops the ceiling with a dense, fibrous embrace, filling every nook and cranny to prevent heat escape and drafts.
When selecting the perfect ceiling insulation garage, consider these essential factors: durability, ease of installation, and the specific climate conditions of your locale. For those seeking a harmonious blend of practicality and eco-consciousness, blown-in cellulose often emerges as the preferred choice, weaving insulation into the very fabric of your space. Such materials don’t just insulate—they elevate the entire experience of your garage, turning it into a haven of warmth and efficiency.
Benefits of Insulating Your Garage Ceiling
Energy Efficiency and Cost Savings
In the grand theatre of home improvement, few acts deliver a more compelling performance than ceiling insulation garage. It’s a subtle hero in the story of energy efficiency, quietly slashing utility bills while maintaining a cosy sanctuary amidst the chaos of tools and tyres. Properly insulating your garage ceiling not only curtails heat loss but also elevates the overall comfort—an unsung victory for any homeowner.
Beyond the visible perks, insulating your garage ceiling can lead to significant cost savings. By reducing the strain on your heating system, you’ll notice your energy bills shrink without sacrificing warmth. This isn’t just about pennies; it’s an investment in the long-term sustainability of your property. For those contemplating the broader benefits, consider that a well-insulated garage can also prevent the dreaded ice dam formation in winter, further safeguarding your living space.
To appreciate the full scope of advantages, think of ceiling insulation garage as a strategic move—one that offers both immediate financial dividends and enduring environmental benefits. Its impact echoes through the seasons, making every penny spent on insulation an astute choice for the discerning homeowner.
Temperature Regulation
Imagine a sanctuary where the chill of winter and the scorch of summer are held at bay, a realm shaped by the subtle power of ceiling insulation garage. This enchanted barrier transforms the garage into a space that breathes with a balanced temperature, regardless of the season’s whimsy. When properly installed, ceiling insulation garage acts like an invisible guardian, smoothing out temperature fluctuations and creating a cosy haven for both tools and treasured possessions.
One of the most compelling benefits of ceiling insulation garage is its ability to regulate temperature with finesse. It prevents the rapid loss of heat during frosty mornings and shields against the searing heat of summer. This equilibrium not only extends the lifespan of stored items but also makes the space more inviting for hobbies or even as an extension of your living area. For those seeking to maximise comfort and efficiency, understanding the strategic placement of insulation can unlock a world of transformed spaces.
In essence, insulating your garage ceiling weaves a silent spell of climate control, turning an ordinary garage into an efficient, sustainable, and more comfortable retreat. It’s an investment that pays dividends in both tangible savings and the serenity of perfect indoor temperature regulation.
Noise Reduction
Beyond the obvious climate benefits, ceiling insulation garage offers a surprising and often overlooked advantage: noise reduction. The thick layers of insulation act as a buffer, absorbing sound waves and decreasing the transmission of noise from the outside world or within the garage itself. For those who use their garage as a workshop or hobby space, this can be a game-changer, transforming a noisy environment into a tranquil retreat.
Imagine the clatter of tools or the hum of machinery softened by the insulating barrier—creating a more peaceful atmosphere for work or relaxation. This acoustic dampening effect not only boosts comfort but also helps maintain a more serene home environment, especially if the garage is adjacent to living spaces. The benefits become even more pronounced when combined with other soundproofing measures, making ceiling insulation garage an essential upgrade for multi-purpose garages.
In addition, insulating your garage ceiling can help minimise sound pollution, a concern in densely populated areas. This subtle yet significant benefit underscores how thoughtful insulation extends beyond temperature control, enhancing overall quality of life and neighbourly harmony. Truly, ceiling insulation garage isn’t just about energy efficiency; it’s about creating a sanctuary from the world’s noise, right in your own home.
Protection of Stored Items
Protecting your treasured tools, vintage collectibles, and seasonal decorations is paramount—especially when your garage doubles as a workshop or storage haven. Ceiling insulation garage provides an unseen shield, creating a microclimate that safeguards stored items from temperature fluctuations and humidity. This insulation not only prevents potential damage caused by mould or rust but also maintains a consistent environment that preserves delicate belongings.
Imagine a space where your cherished possessions stay pristine, untouched by the whims of weather outside. To enhance this protective barrier, consider these features:
- Reduction of condensation that can lead to mould growth
- Minimisation of temperature swings that cause warping or deterioration
- Enhanced overall security for valuable or sensitive items
Ceiling insulation garage acts as an invisible guardian, ensuring your stored items remain in impeccable condition over the years. It’s not just about comfort or energy savings—it’s about creating a sanctuary within your garage, where your belongings are shielded from the relentless march of time and the unpredictable elements beyond. Truly, the right insulation transforms your garage into a fortress of preservation and peace of mind.
Types of Insulation Suitable for Garage Ceilings
Fiberglass Batts and Rolls
When it comes to ceiling insulation garage, choosing the right material can make all the difference in creating a comfortable, energy-efficient space. Among the most popular options are fiberglass batts and rolls, renowned for their affordability and ease of installation. These versatile materials are crafted from fine glass fibres, which trap air pockets to provide excellent thermal resistance, helping to keep your garage warmer in winter and cooler in summer.
Fiberglass batts and rolls are particularly appealing because they fit snugly between ceiling joists, conforming to irregular spaces with minimal effort. Their non-combustible nature adds an extra layer of safety, especially important in a garage setting where sparks or heat may be present. For those seeking a straightforward solution, fiberglass remains a go-to choice, blending efficiency with convenience.
- Cost-effectiveness
- Ease of installation
- Fire resistance
- Soundproofing qualities
This combination of benefits makes fiberglass batts and rolls a top contender for any ceiling insulation garage upgrade, ensuring your workspace is both comfortable and secure. The right insulation choice directly influences long-term energy savings and the overall usability of your garage, making it a wise investment for homeowners and DIY enthusiasts alike.
Foam Board Insulation
In the realm of transforming your garage into a sanctuary of comfort and efficiency, the choice of insulation material plays a pivotal role. Among the myriad options, foam board insulation stands out as a beacon of versatility and durability. Its rigid, dense structure offers exceptional thermal resistance, creating a formidable barrier against the unpredictable whims of weather. For those seeking a seamless blend of strength and insulation prowess, foam board provides a solution that is both practical and resilient.
Unlike traditional materials, foam board insulation for a garage ceiling boasts a striking ability to minimise air leaks and enhance energy conservation. Its sleek panels can be cut precisely to fit between ceiling joists, forming an airtight shield that elevates the overall insulation quality. When considering the best approach for ceiling insulation garage, foam board emerges as a compelling choice, ensuring your space remains warm in winter and cool in summer with minimal effort.
- High insulating value per inch of thickness
- Moisture resistance, preventing mould growth
- Ease of installation for DIY enthusiasts
In the symphony of garage renovation, foam board insulation harmonises strength with performance, turning a basic space into a haven of energy efficiency and comfort. Its capacity to safeguard stored items and reduce noise levels makes it an indispensable element in the quest for a perfect ceiling insulation garage.
Spray Foam Insulation
When it comes to choosing the ideal material for ceiling insulation garage, spray foam insulation often steals the spotlight — and for good reason. Its seamless application creates an airtight seal, effectively eliminating pesky drafts and air leaks that can sabotage your energy efficiency efforts. Unlike traditional options, spray foam adheres directly to the ceiling, expanding to fill every nook and cranny, ensuring a uniform layer of insulation.
One of the most compelling benefits of spray foam insulation for a garage ceiling is its superior R-value per inch, making it perfect for those tight spaces where every bit of thermal resistance counts. Plus, it’s a champion at moisture resistance, preventing mould and mildew from turning your garage into a damp den. Whether you’re after quick DIY installation or considering professional help, spray foam offers versatility and durability, turning your garage ceiling into a fortress of energy efficiency.
Reflective or Radiant Barriers
In the quest for optimal energy conservation, the choice of material for ceiling insulation garage can profoundly influence both comfort and utility costs. Among the myriad options, reflective or radiant barriers stand out as a sophisticated solution, especially suited to climates with high summer heat or significant temperature fluctuations. These barriers do not add bulk but instead reflect radiant heat away from the garage’s interior, effectively reducing heat transfer and maintaining a more stable environment. Their thin profile makes them ideal for tight spaces where traditional insulation might be impractical.
In essence, reflective barriers act as a mirror to heat, redirecting thermal energy before it penetrates the ceiling. For those seeking an unconventional yet highly effective method, installing a radiant barrier can complement existing insulating materials, augmenting the overall R-value without sacrificing ceiling height. As a result, this approach offers a nuanced layer of thermal resistance—an elegant solution for a well-insulated garage ceiling that responds to the specific demands of your climate and usage.
Step-by-Step Guide to Installing Garage Ceiling Insulation
Preparation and Safety Measures
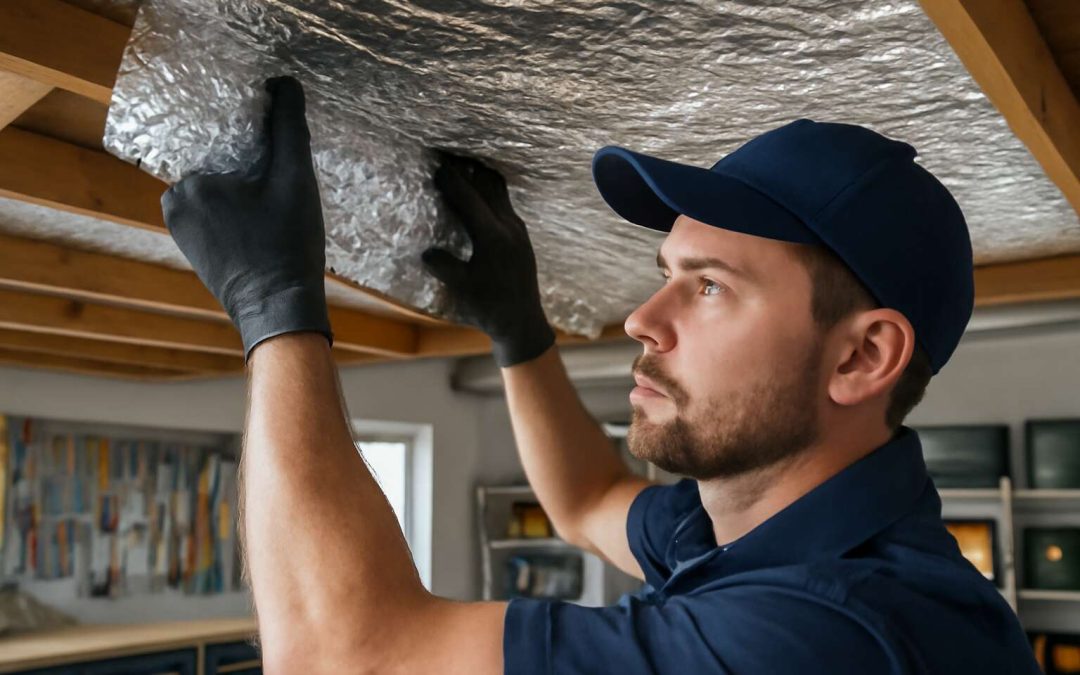
Embarking on the journey to install ceiling insulation in your garage can feel like uncovering a hidden treasure—rewarding yet demanding precision. Before diving in, it’s crucial to prepare thoroughly, ensuring both safety and efficiency. The first step involves clearing the workspace—removing stored items and any obstructions that might hinder your progress. Adequate preparation sets the stage for a seamless installation, especially when handling materials like fiberglass batts or spray foam insulation.
Safety measures are paramount. Always wear protective gear—gloves, goggles, and a dust mask—to shield yourself from potential irritants and airborne debris. Ventilate the area well, particularly if using spray foam or other chemical-based materials. To streamline the process, consider following a systematic approach:
- Check the garage ceiling for any structural issues or obstructions.
- Measure the ceiling area precisely to determine the amount of insulation needed.
- Gather all necessary tools—utility knives, staples, or adhesive—before starting.
Remember, a well-prepared workspace not only enhances safety but also paves the way for a flawless installation of your ceiling insulation garage, ensuring maximum energy efficiency and noise reduction for years to come.
Measuring and Selecting Insulation Material
Before you start wielding that tape measure and unrolling your chosen ceiling insulation garage material, a little strategic planning goes a long way. Accurate measurement is the backbone of a successful install, ensuring you don’t end up with gaps or wasted insulation. Grab your tape measure, a notepad, and a calculator—yes, it’s almost like a mini science experiment. Measure the length and width of your garage ceiling precisely, accounting for any obstructions like beams or vents that might throw off your calculations. This helps you determine the exact amount of ceiling insulation garage you’ll need, saving both time and money.
When selecting the right insulation material, consider factors like thermal resistance (R-value), ease of installation, and compatibility with your garage environment. For instance, fiberglass batts are user-friendly and widely available, but spray foam offers superior sealing properties—ideal for a well-insulated garage ceiling that keeps everything cosy and quiet. To simplify your shopping, you might find it handy to compile a quick list of essential materials:
- Measuring tape
- Insulation material (fiberglass, spray foam, or foam board)
- Utility knife or insulation saw
- Stapler or adhesive
- Protective gear – gloves, goggles, dust mask
Getting these steps right ensures your ceiling insulation garage is not only effective but also a breeze to install, transforming your garage into a haven of energy efficiency and peace from noisy neighbours. Remember, precision here is your best friend—because nobody wants to re-do the job after discovering they’ve under-measured or picked the wrong material!
Installation Process
Embarking on the journey to insulate your garage ceiling is a task steeped in both science and artistry. Once you’ve chosen your ideal ceiling insulation garage material, the installation process becomes a dance of precision and patience. The key is to approach it methodically, like a craftsman shaping a masterpiece. Begin by ensuring the area is free of obstructions and well-ventilated, creating a safe environment for your work.
Next, cut the insulation to fit snugly between ceiling joists, ensuring no gaps or compression that could undermine its thermal performance. For batt or roll insulation, a utility knife or insulation saw works wonders, allowing you to shape the material with finesse. When fitting foam board insulation, secure each piece with adhesive or fasteners, taking care not to leave gaps that compromise insulation efficiency.
To maintain a seamless barrier against heat loss, consider the following steps:
- Seal any cracks or gaps with appropriate spray foam or sealant before installing the insulation.
- Use a staple gun or adhesive to affix insulation if necessary, ensuring it stays in place even during temperature fluctuations.
- Layer reflective or radiant barriers if you’re aiming to optimise the energy efficiency of your garage ceiling insulation.
Throughout this process, safety remains paramount—wear protective gear, and handle materials with care. As you progress, remember that patience and attention to detail are your allies, transforming what might seem a mundane task into a symphony of craftsmanship, culminating in a garage that’s warm, quiet, and energy-efficient—thanks to your meticulous ceiling insulation garage project.
Post-Installation Checks
Once your ceiling insulation garage has been meticulously installed, it’s tempting to bask in the glow of accomplishment. Yet, the process does not end there; thorough post-installation checks are essential to ensure your effort translates into long-term efficiency. Conduct a detailed visual inspection, scrutinising every corner for potential gaps or loose fittings that could undermine the insulation’s performance. These seemingly minor flaws can cause significant heat loss, undoing all your labour.
Next, verify that the insulation material is securely affixed, especially if it’s batt or foam board. Use a flashlight to illuminate hidden spaces and confirm there are no uninsulated areas. Pay close attention to seals around ceiling penetrations, vents, or fixtures—these are common culprits for thermal leakage. A good practice is to run your hand along the surface to detect any sagging or compression that may have occurred during installation.
To further optimise energy retention, consider adding reflective barriers or radiant foil layers, which can reflect heat back into the garage and enhance your ceiling insulation garage’s effectiveness. Remember that comprehensive checks not only safeguard your investment but also uphold the integrity of your garage’s thermal barrier, turning your insulation project into a symphony of efficiency and resilience.
Factors to Consider When Choosing Insulation
R-Value and Climate Compatibility
In the pursuit of a warm, energy-efficient sanctuary, selecting the appropriate R-value for your ceiling insulation garage becomes a nuanced dance between comfort and practicality. High R-values offer superior thermal resistance, but they must be compatible with your local climate to truly be effective. In colder regions, opting for insulation with a higher R-value ensures your garage remains inviting during winter’s harsh embrace. Conversely, milder climates may find moderate R-values sufficient, preventing unnecessary expenditure and over-insulation.
When contemplating the ideal ceiling insulation garage, consider climate compatibility as a pivotal factor. For instance, areas experiencing extreme temperature fluctuations demand insulation that can adapt swiftly, maintaining a stable environment. Here, a simple list can clarify choices:
- Assess local climate conditions
- Match insulation R-value to seasonal extremes
- Balance cost with long-term energy savings
Ultimately, the harmony between R-value and climate responsiveness ensures your garage remains a sanctuary of comfort, regardless of weather’s whims.
Vapor Barriers and Moisture Control
When it comes to safeguarding your sanctuary of steel and concrete, the choice of vapor barriers and moisture control for your ceiling insulation garage is a decision layered with nuanced importance. Moisture, often a silent adversary, can infiltrate through tiny breaches, leading to mould, corrosion, and even compromised insulation performance. A well-chosen vapor barrier acts as a steadfast guardian, preventing damp air from penetrating and wreaking havoc within your garage’s attic space.
Factors such as the climate’s humidity levels and the presence of existing water sources shape the ideal moisture management strategy. For garages nestled in humid environments, a robust vapour barrier becomes paramount. Conversely, in arid regions, a lighter approach may suffice. An effective method involves integrating vapor retarders that are compatible with the chosen insulation material, ensuring seamless synergy between layers. Remember, the goal is to create a fortress against moisture while allowing breathability where necessary, protecting your investment and preserving the integrity of your ceiling insulation garage.
Budget and Long-term Cost Effectiveness
When selecting the ideal ceiling insulation garage, the dance between initial expenditure and long-term savings becomes a vital consideration. A modest upfront investment might seem alluring, yet it often pales in comparison to the cumulative energy costs that accrue over years of inefficient insulation. Think of your garage as a fortress—every penny spent on quality insulation fortifies your refuge against the relentless siege of temperature fluctuations and energy drain.
Factors such as durability, maintenance requirements, and the lifespan of insulation materials influence the overall cost-effectiveness. For instance, opting for high R-value materials may involve higher initial costs but promise superior thermal performance and longevity. An astute choice involves balancing budget constraints with the promise of reduced utility bills. Sometimes, an expanded view reveals that investing in premium ceiling insulation garage today yields dividends in comfort and savings tomorrow.
Compatibility with Garage Use
When selecting the perfect ceiling insulation for your garage, compatibility with the space’s intended use becomes paramount. A garage serves as more than just a shelter for vehicles; it’s a workspace, a storage vault, and sometimes even a refuge from the chaos of the outside world. The insulation must adapt to these varied demands, offering both protection and versatility.
Consider how the insulation material interacts with the garage’s purpose. For instance, if you plan to convert it into a workshop, acoustic properties and fire resistance might take precedence. Conversely, if storage is your prime concern, moisture resistance and durability become critical factors.
- Assess the level of moisture exposure — damp garages require moisture-resistant materials to prevent mould and decay.
- Evaluate thermal performance — high R-value ceiling insulation garage can significantly improve temperature regulation.
- Factor in ease of installation — complex materials may demand professional fitting, adding to costs and downtime.
Ultimately, the compatibility of your ceiling insulation garage hinges on understanding these nuanced needs. A harmonious blend of material qualities ensures your garage remains a sanctuary, whether for work, storage, or leisure, all while maintaining energy efficiency and safety. The choice isn’t merely about insulation; it’s about crafting a space that withstands the relentless march of time and temperature.
DIY vs. Professional Installation
Advantages of DIY
Opting for DIY installation of ceiling insulation in your garage can feel like a bold act of independence—an assertion of control over your space and budget. The advantages are immediate: reduced costs, a sense of accomplishment, and the flexibility to tailor the project to your specific needs. For those with a steady hand and a keen eye, this approach offers a rewarding opportunity to engage directly with your home’s energy efficiency.
However, the allure of professional installation cannot be dismissed. Skilled installers bring expertise that maximises the performance of your ceiling insulation garage, ensuring optimal R-value and moisture control. Their experience translates into a seamless process, minimising the risk of gaps or misapplication that could compromise insulation effectiveness.
Many homeowners find that a hybrid approach—handling simpler tasks themselves while leaving complex or hazardous steps to experts—strikes the perfect balance. Whether you choose DIY or professional installation, understanding the nuanced advantages ensures your garage remains a sanctuary of warmth, safety, and efficiency.
Benefits of Hiring Professionals
Choosing between DIY and professional installation for your ceiling insulation garage can significantly impact the outcome. While DIY offers immediate savings and the satisfaction of completing the project yourself, it also requires a certain level of skill and safety awareness. Homeowners confident in their abilities can often handle simple tasks like measuring and fitting insulation materials, but complex steps—such as ensuring proper vapour barriers and securing insulation evenly—are best left to experts.
Professionals bring specialised tools and a wealth of experience, which translate into a more effective and durable ceiling insulation garage. Their expertise helps prevent common issues like gaps, compression, or incorrect installation that can undermine insulation performance. For those unsure about safety procedures or working with hazardous materials, hiring a professional is often the wiser choice.
- Maximises insulation efficiency
- Ensures compliance with safety standards
- Provides long-term peace of mind
In many cases, a hybrid approach works best—DIY for straightforward tasks like measuring and preparing, with professionals handling the tricky, hazardous, or detailed aspects. Whether opting for DIY or professional installation, understanding these benefits ensures your garage remains a warm, safe, and energy-efficient space. Remember, a well-installed ceiling insulation garage can cut heating costs and improve comfort for years to come!
When to Call a Specialist
Choosing between DIY and professional installation for your ceiling insulation garage is a decision that can influence the longevity and effectiveness of your investment. While tackling the task yourself might seem like a cost-saving adventure, it’s not always the best route when aiming for maximum energy efficiency and safety. DIY projects often work well for measuring and preparing materials, but the intricate details—such as ensuring a proper vapour barrier or even insulation coverage—are best left to seasoned experts. Their specialised tools and experience help prevent common pitfalls like gaps or uneven fitting, which can drastically reduce insulation performance.
When the project involves complex considerations—such as working with hazardous materials or achieving precise insulation levels—calling in a professional becomes essential. A skilled installer can identify potential moisture issues or structural challenges that might otherwise go unnoticed. Sometimes, a hybrid approach makes sense: homeowners might handle the initial measurements and procurement, then let professionals take care of the tricky installation. Ultimately, whether you choose DIY or professional installation, understanding the nuances of ceiling insulation garage ensures your space stays warm, safe, and energy-efficient for years to come!
Maintenance and Upgrading Garage Ceiling Insulation
Signs of Insulation Deterioration
Maintaining the integrity of your ceiling insulation garage is a task often overlooked until discomfort or inefficiency begins to manifest. Over time, insulation materials are susceptible to deterioration, which can silently undermine your efforts to keep the garage climate-controlled. Recognising the subtle signs of deterioration—such as uneven temperature fluctuations, increased noise infiltration, or visible mould growth—is crucial for preserving energy efficiency and protecting stored items.
Persistent moisture issues can accelerate the breakdown of materials, leading to sagging or compressed insulation layers that no longer serve their purpose effectively. A keen eye for these indicators ensures that minor issues don’t escalate into costly repairs. Regular inspections should focus on signs like discolouration, pest intrusion, or gaps in the insulation layer—each a telltale sign that your ceiling insulation garage may need upgrading.
For those seeking longevity and optimal performance, understanding when to consider an upgrade is vital. Upgrading your ceiling insulation garage not only enhances thermal efficiency but also prevents energy wastage and maintains a more consistent internal environment.
Routine Inspection Tips
Maintaining the integrity of your ceiling insulation garage is an ongoing dance with time and elements. Regular inspections are vital, allowing you to catch the subtle signs of deterioration before they evolve into costly repairs. A simple visual check can reveal discolouration, sagging, or gaps—each whispering that your insulation may be losing its effectiveness. Pests or mould growth are silent invaders that compromise the insulation’s protective barrier, while increased noise infiltration hints at compromised layers.
To keep your ceiling insulation garage performing at its peak, consider a routine inspection schedule. An easy method is to follow this sequence:
- Examine for discolouration or water stains.
- Check for any visible gaps or sagging in the insulation layers.
- Spot signs of pest intrusion such as droppings or gnaw marks.
- Ensure moisture isn’t accumulating, which can accelerate deterioration.
Should these signs become evident, it’s wise to evaluate whether an upgrade is necessary. An upgraded ceiling insulation garage enhances thermal efficiency, reduces energy wastage, and sustains a stable environment—cornerstones of a well-maintained space. Remember, a vigilant eye ensures your garage remains a sanctuary of comfort and protection, not a battleground against invisible decay.
Upgrading Old Insulation
Maintaining the integrity of your ceiling insulation garage is an ongoing process that can significantly impact your property’s energy efficiency. When insulation begins to age or deteriorate, its ability to regulate temperature diminishes, leaving your garage vulnerable to the elements. Upgrading old insulation not only revitalises the space but also enhances thermal performance, making it a smart investment for long-term savings.
If your garage ceiling insulation shows signs of wear—such as discolouration, sagging, or gaps—it’s time to consider an upgrade. An effective method involves removing the outdated material and replacing it with modern insulation options like spray foam or reflective barriers. These materials offer superior R-values and moisture resistance.
- Assess the current condition of your insulation.
- Identify areas with water stains or mould growth.
- Choose a premium insulation material suited for garage use.
- Consult with professionals to ensure proper installation.
A thoughtfully upgraded ceiling insulation garage ensures your space remains a sanctuary of comfort, protected against the relentless march of time and weather, while also safeguarding your stored valuables.
Cost Estimates and Budget Planning
Cost of Materials
Understanding the true cost of ceiling insulation garage projects requires more than just a glance at the price tag. It’s an intricate dance between material quality, installation complexity, and long-term savings. Budget planning should account for all these elements, ensuring that the investment aligns with your financial and functional goals.
Material costs can vary widely depending on the type of insulation chosen. Fiberglass batts, foam boards, and spray foam each come with their own price points and benefits. For example, fiberglass is typically more affordable, while spray foam offers superior energy efficiency and moisture control. It’s wise to compare these options carefully, considering the R-value and climate suitability.
To simplify decision-making, consider this outline of typical expenses:
- Material purchase costs
- Additional safety equipment or preparation tools
- Potential professional installation fees
Careful budget estimation and prioritising quality can make all the difference in achieving a durable and efficient ceiling insulation garage that stands the test of time.
Installation Expenses
When planning your ceiling insulation garage project, understanding the intricacies of cost estimates is essential for making informed decisions. While the initial outlay might seem straightforward, the true expenses extend beyond the price tags of materials. A comprehensive budget must consider installation fees, safety equipment, and potential upgrades, all of which influence the overall investment.
Material costs can fluctuate significantly depending on the chosen type of insulation. Fiberglass batts, foam boards, and spray foam each possess unique price points and performance attributes. For instance, fiberglass tends to be more budget-friendly, yet spray foam offers premium energy efficiency and moisture control. To navigate this landscape wisely, it’s helpful to evaluate the R-value and climate considerations, ensuring your ceiling insulation garage is optimally suited to your environment.
In terms of installation expenses, professional labour often accounts for a considerable portion of the total cost. Yet, some homeowners find DIY projects appealing, especially for straightforward applications, which can reduce overall expenditure. However, safety precautions and precise measurement are paramount. Here’s a quick overview of typical costs involved:
- Material purchase costs
- Additional safety equipment or preparation tools
- Potential professional installation fees
Meticulous budget planning, paired with an emphasis on quality, can transform your ceiling insulation garage into a resilient sanctuary against the elements—an investment that pays dividends in long-term energy savings and comfort. Every penny spent on quality materials and expert installation contributes to a garage that maintains its integrity and efficiency for years to come.
Potential Savings and Incentives
Cost estimates for ceiling insulation garage projects often resemble a labyrinth of variables, each whispering promises of savings or expenses. While material costs form the foundation—fiberglass batts, foam boards, and spray foam each bring their own price tag—they are merely the beginning. Additional safety equipment, preparation tools, and potential professional installation fees can subtly inflate the overall budget.
Smart planning can uncover hidden savings; for instance, DIY installation might cut costs but demands careful measurement and safety precautions. Sometimes, a simple
- assessment of insulation requirements
- comparison of material R-values
- consideration of climate influences
can make all the difference. In the realm of ceiling insulation garage, understanding these nuances enables homeowners to craft a budget that balances quality with affordability, ensuring the long-term prosperity of your investment.